Common Scientific Visualization Mistakes (And How to Fix Them)

The science was excellent, but the figures? Not so much. After reviewing hundreds of papers, we see the same five mistakes over and over. Bad figures can kill good science - and most researchers have never been formally taught how to make good ones.
This guide identifies the most common figure errors and shows you exactly how to fix each one with live Python code you can edit and run.
What You'll Learn
0.Live Code Lab: Good vs Bad Figures
1.The Legend From Hell
2.The Scale That Lies
3.The Font That's Too Small
4.The Raster Export Disaster
5.The Colorblind Nightmare
6.Too Much Non-Data Ink
7.The Automated Fix
0. Live Code Lab: Good vs Bad Figures
The same data plotted two ways - the left panel shows common mistakes (tiny fonts, red-green palette, heavy grid, cluttered box frame) while the right panel applies best practices.
Edit the code to experiment with different styling choices. See how small changes dramatically affect readability.
1. The Legend From Hell
Legends with 15 different colors, 8 line styles, and 12 symbols. It looks like a rainbow threw up on your figure.
The Problem
Overstuffed legends force constant eye-scanning between data and legend box. The reader spends cognitive effort decoding colors instead of understanding the science.
The Fix
- Direct labeling: place text next to lines instead of a separate legend
- Small multiples: more than 5-6 items? Use subplots instead
- Simplify: show the average and range, not all 20 samples
This example shows the same multi-line story two ways. The left panel uses an overloaded legend. The right panel uses direct labels so readers can decode the chart instantly.
2. The Scale That Lies
Different subplots with different scales make cross-panel comparison impossible. Or worse: bar charts that do not start at zero, which visually exaggerates small differences.
The Problem
A bar starting at 50 instead of 0 makes a 60-vs-55 difference look dramatic when it is really just 8%.
The Fix
- Bar charts: always start at zero
- Sync axes: use the same scale for all panels showing the same measure
- Line charts: you can zoom in, but label breaks clearly
Run this code to compare a truncated y-axis against a zero-baseline axis. The numeric difference stays the same, but the visual story changes dramatically.
3. The Font That is Too Small
Text so small you need a magnifying glass. This usually happens when you resize a large figure to fit a small journal column.
Key Rules
- Design for final size. If the figure will be 8 cm wide, design it at 8 cm wide.
- Minimum font size: never go below 8 pt. Aim for 10-12 pt axis labels.
- Test at print size: zoom your PDF to 100% and check readability on screen.
The plot on the left imitates text shrinking after export. The right plot uses publication-ready typography for better readability at final figure size.
Try it
Try it now: review your figure before submission
Upload your current plot and get an AI critique with concrete fixes for clarity, typography, color, and journal readiness.
Open AI Figure Reviewer →Newsletter
Get a weekly Python plotting tip
One concise tip each week for cleaner, faster scientific figures. Built for researchers who publish.
4. The Raster Export Disaster
Figures exported as PNG or JPEG that look pixelated when printed at publication size. This is the number-one technical rejection reason for figures.
Vector Always
Use SVG or PDF for manuscripts. These formats scale infinitely without quality loss. Plotivy exports vector SVG by default.
When Raster is Required
For heatmaps or microscopy images that must be raster, use at least 300 DPI (600 DPI preferred). Set this in matplotlib: fig.savefig("fig.png", dpi=600)
This side-by-side demo simulates how low-resolution rasters break when scaled, while vector-style rendering keeps edges crisp and publication-ready.
Stop making these mistakes
Plotivy automatically handles vector exports, proper font sizes, and colorblind-safe palettes - so you can focus on your research.
5. The Colorblind Nightmare
About 8% of men have some form of color vision deficiency. Red-green is the most common problem palette - yet it remains the default in many tools and papers.
A safer workflow: grayscale first, then color
- 1.Draft the chart in grayscale first. If groups are clear by line style, marker shape, and order, the chart is already robust.
- 2.Apply a colorblind-safe palette second (Viridis, Cividis, Plasma, or the colorblind-friendly categorical palette below) to improve speed of interpretation.
- 3.Avoid pale yellow on white backgrounds. Use darker amber tones, or add a dark edge/line so labels and marks remain readable.
Python palette previews
These are practical defaults you can use in matplotlib or seaborn. Sequential maps work well for intensity. Categorical palettes work well for discrete groups.
tab10 (avoid)
Contains red & green - problematic for colorblind viewers.
colorblind-friendly (use this)
Safe palette with high contrast for all viewers.
This live editor compares three palette strategies: problematic red-green, safe Viridis, and the gold-standard double-encoded approach (colors + markers + linestyles).
6. Too Much Non-Data Ink (Clutter)
Edward Tufte's data-ink ratio principle: maximize the ink devoted to data, minimize everything else. Heavy gridlines, unnecessary borders, and decorative elements distract from the actual findings.
Top and right spines, background colors, heavy gridlines, 3D effects, chart borders
Data points, axis labels, title (if needed), minimal Y-axis gridlines, direct labels
Whether the legend is needed at all - direct labeling is almost always better
The left panel intentionally adds chart junk. The right panel removes non-essential ink so the trend becomes immediately clear.
The Scientific Visualization
Visualization Guide
We're finalizing a practical PDF guide for researchers who need clearer scientific figures, reusable Python plotting templates, and publication-ready visualization workflows without starting from a blank notebook.
What the guide will help you improve
Figure readability, chart selection, annotation discipline, export quality, and repeatable Python workflows for lab reports, papers, and internal research updates.
Visualization
7. The Automated Fix
You could memorize all these rules and check every figure manually. Or you could use a tool that applies them by default. Plotivy automatically:
Colorblind-safe palettes
Uses perceptually uniform colormaps and double-encoding by default.
Correct font sizes
Sizes axis labels and titles for the figure's final output dimensions.
Vector export
Exports SVG and high-DPI PNG. No more pixelated conference posters.
Clean data-ink ratio
Removes top/right spines, uses subtle gridlines, and adds direct labels.
This demo applies one reusable style function to the same data. It shows how automation enforces clean defaults and prevents common formatting regressions.
Chart gallery
Gallery picks that already follow best practices
Use gallery recipes that enforce correct axes, error bars, and color-safe palettes out of the box.

Error Bars
Graphical representations of the variability of data indicating error or uncertainty in measurements.
Sample code / prompt
import numpy as np
import matplotlib.pyplot as plt
from scipy import stats

# Generate bacterial growth data with replicates
np.random.seed(42)
time_points = np.array([0, 4, 8, 12, 18, 24])
mean_values = np.array([10, 25, 80, 250, 600, 800])

# Generate 5 replicates per time point with noise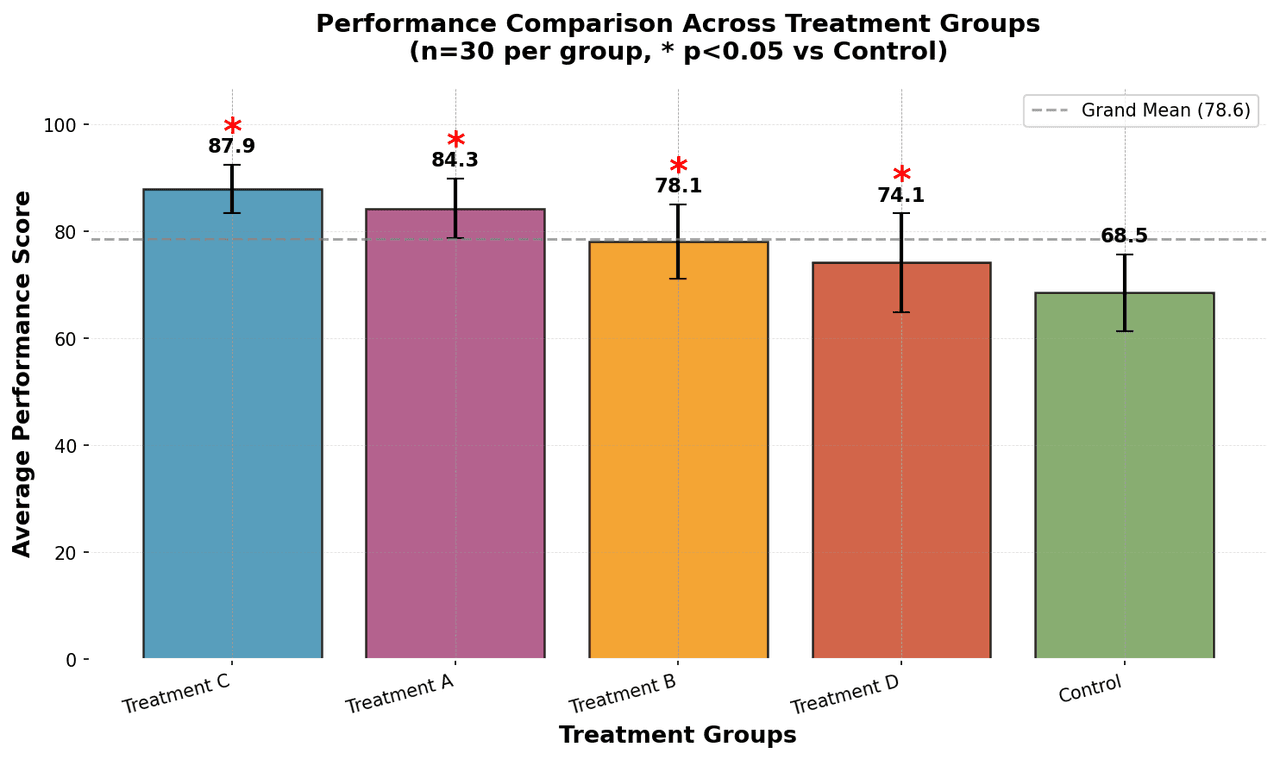
Bar Chart
Compares categorical data using rectangular bars with heights proportional to values.
Sample code / prompt
import numpy as np
import pandas as pd
import matplotlib.pyplot as plt
import seaborn as sns
from scipy import stats

# Generate performance scores for 5 treatment groups
np.random.seed(42)
groups = ['Control', 'Treatment A', 'Treatment B', 'Treatment C', 'Treatment D']
n_samples = 30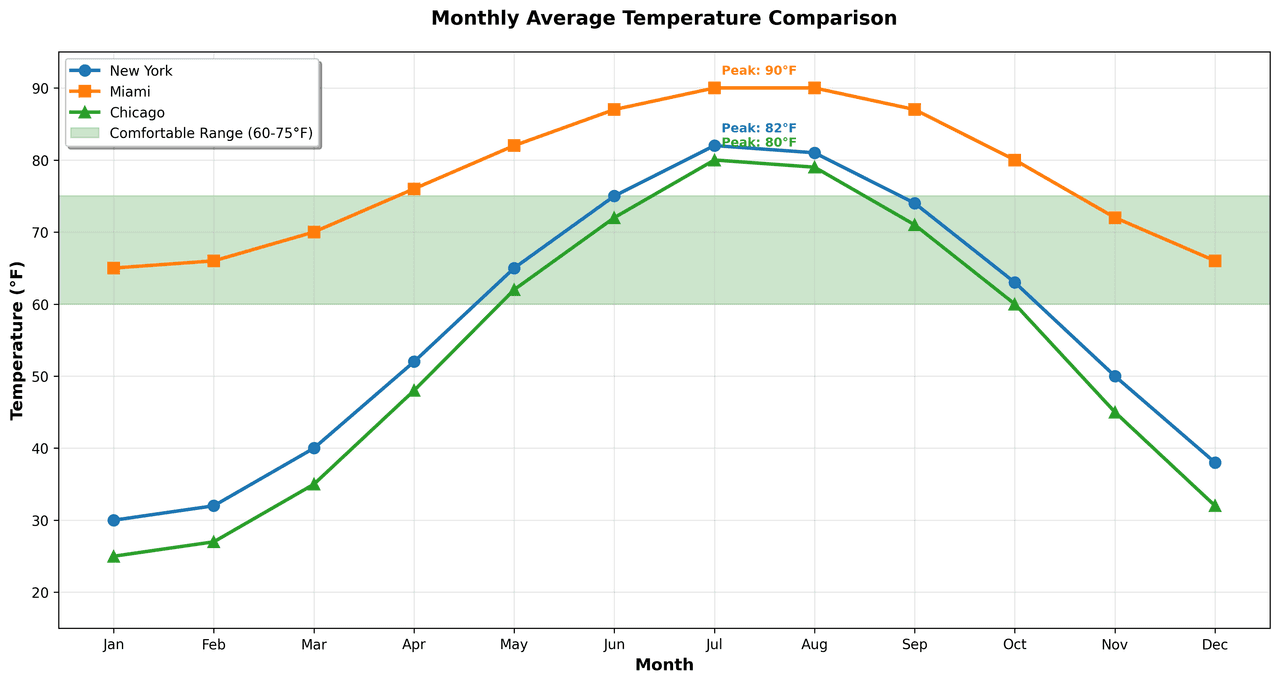
Line Graph
Displays data points connected by straight line segments to show trends over time.
Sample code / prompt
import matplotlib.pyplot as plt
import numpy as np

# Generate temperature data for 3 major US cities over 12 months
months = ['Jan', 'Feb', 'Mar', 'Apr', 'May', 'Jun', 'Jul', 'Aug', 'Sep', 'Oct', 'Nov', 'Dec']
nyc = [30, 32, 40, 52, 65, 75, 82, 81, 74, 63, 50, 38]
miami = [65, 66, 70, 76, 82, 87, 90, 90, 87, 80, 72, 66]
chicago = [25, 27, 35, 48, 62, 72, 80, 79, 71, 60, 45, 32]

# Create figure with enhanced styling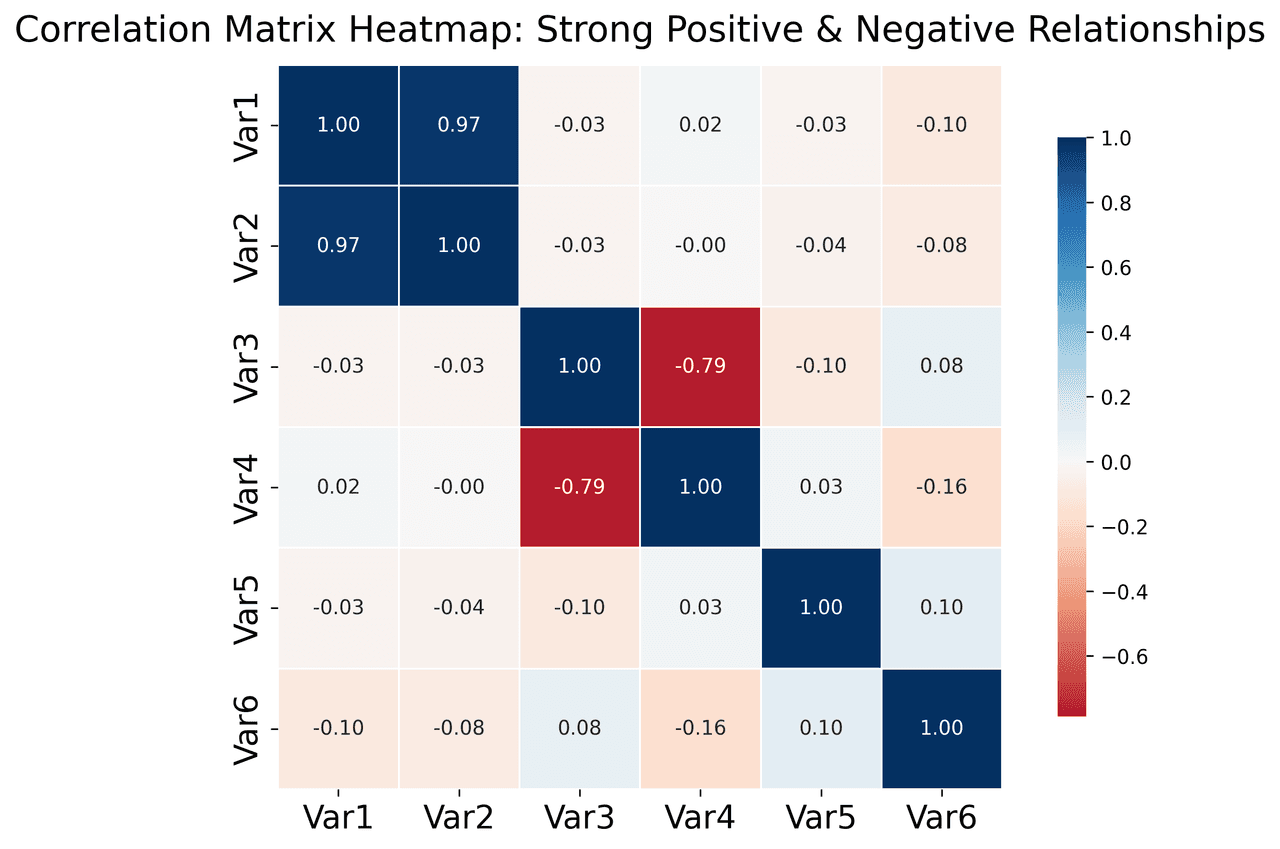
Heatmap
Represents data values as colors in a two-dimensional matrix format.
Sample code / prompt
import matplotlib.pyplot as plt
import seaborn as sns
import pandas as pd
import numpy as np

# Create correlation matrix for financial metrics
metrics = ['Revenue', 'Profit', 'Expenses', 'ROI', 'Customers', 'AOV', 'Marketing', 'Employees']
correlation_data = np.array([
    [1.00, 0.85, -0.45, 0.72, 0.88, 0.65, 0.72, 0.55],
[0.85, 1.00, -0.78, 0.92, 0.75, 0.58, 0.63, 0.48],Avoid These Mistakes Automatically
Every figure generated by Plotivy follows visualization best practices by default. Focus on your science, not your figure formatting.
Related chart guides
Apply this tutorial directly in the chart gallery with ready-to-run prompts and examples.
Technique guides scientists read next
scipy.signal.find_peaks guide
Tune prominence and width parameters for robust peak extraction.
Savitzky-Golay smoothing
Reduce noise while preserving peak shape and position.
PCA visualization workflow
Move from high-dimensional measurements to interpretable components.
ANOVA with post-hoc brackets
Add statistically correct pairwise significance annotations.
Found this helpful? Share it with your network.
Experimental Physicist & Photonics Researcher
Hands-on experience in silicon photonics, semiconductor fabrication (DRIE/ICP-RIE), optical simulation, and data-driven analysis. Built Plotivy to help researchers focus on discoveries instead of data struggles.
More about the authorVisualize your own data
Apply the techniques from this article to your own datasets. Upload CSV, Excel, or paste data directly.