Scatterplot
Chart overview
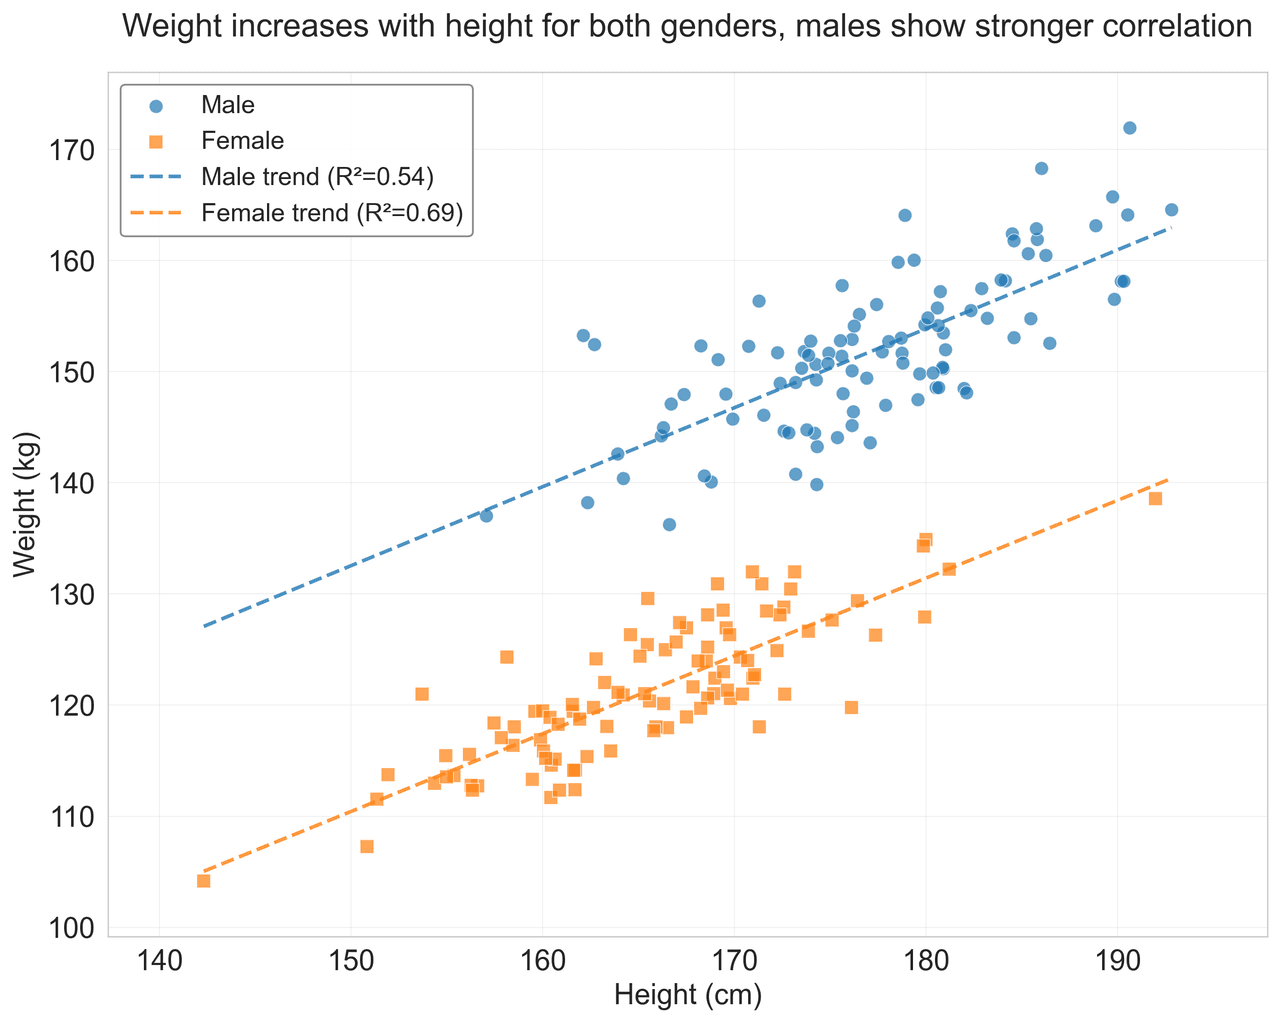
Scatter plots show the relationship between two quantitative variables by plotting data points on a two-dimensional grid.
Key points
- They're fundamental for identifying correlations, clusters, and outliers in your data.
- By adding color, size, or shape encoding, scatter plots can display additional dimensions.
- Regression lines can be added to quantify relationships.
Python Tutorial
How to create a scatterplot in Python
Use the full tutorial for implementation details, troubleshooting, and chart variations in matplotlib, seaborn, and plotly.
Python Scatter Plot TutorialExample Visualization
Create This Chart Now
Generate publication-ready scatterplots with AI in seconds. No coding required – just describe your data and let AI do the work.
View example prompt
"Create a scatter plot analyzing the relationship between 'Height (cm)' and 'Weight (kg)' for 200 individuals. Generate realistic biometric data: heights 150-195cm, weights 45-110kg with positive correlation (r≈0.75). Color points by 'Gender' (Male: blue, Female: pink) using different markers (circles, squares). Add separate linear regression lines for each gender with 95% confidence intervals shaded. Include R² values in the legend. Add a marginal histogram/KDE on both axes showing distributions. Label axes with units, add gridlines, and title 'Height vs Weight by Gender (n=200)'. Annotate any outliers (>2 std from regression line)."
How to create this chart in 30 seconds
Upload Data
Drag & drop your Excel or CSV file. Plotivy securely processes it in your browser.
AI Generation
Our AI analyzes your data and generates the Scatterplot code automatically.
Customize & Export
Tweak the design with natural language, then export as high-res PNG, SVG or PDF.
Newsletter
Get one weekly tip for better scatterplots
Join researchers receiving concise Python plotting techniques to improve chart clarity and reduce revision cycles.
Python Code Example
# === IMPORTS ===
import pandas as pd
import numpy as np
import matplotlib.pyplot as plt
import seaborn as sns
from scipy import stats

# === USER-EDITABLE PARAMETERS ===
# Change: Column names for the plot
x_column = 'Height'  # Change: X-axis variable name
y_column = 'Weight'  # Change: Y-axis variable name
hue_column = 'Gender'  # Change: Color grouping variable

# Change: Plot appearance
figsize = (10, 8)  # Change: Figure size as (width, height)
title_fontsize = 18  # Change: Title font size
label_fontsize = 16  # Change: Axis label and tick font size
male_color = '#1f77b4'  # Change: Color for male points (hex code)
female_color = '#ff7f0e'  # Change: Color for female points (hex code)
male_marker = 'o'  # Change: Marker shape for male points
female_marker = 's'  # Change: Marker shape for female points
alpha = 0.7  # Change: Transparency of points (0-1)
show_regression = True  # Change: Set to False to hide regression lines

# Change: Dataset parameters
n_samples = 200  # Change: Number of data points to generate
random_seed = 42  # Change: Random seed for reproducibility

# === DATA GENERATION ===
# Set random seed for reproducibility
np.random.seed(random_seed)

# Generate synthetic dataset
n_male = n_samples // 2
n_female = n_samples - n_male

# Male data: taller and heavier on average
male_height = np.random.normal(178, 8, n_male)
male_weight = 0.8 * male_height + np.random.normal(10, 5, n_male)

# Female data: shorter and lighter on average
female_height = np.random.normal(165, 7, n_female)
female_weight = 0.7 * female_height + np.random.normal(5, 4, n_female)

# Combine into DataFrame
df = pd.DataFrame({
    'Height': np.concatenate([male_height, female_height]),
    'Weight': np.concatenate([male_weight, female_weight]),
    'Gender': ['Male'] * n_male + ['Female'] * n_female
})

# === STATISTICAL ANALYSIS ===
# Initialize variables
male_slope, male_intercept, male_r, male_p, male_std_err = None, None, None, None, None
female_slope, female_intercept, female_r, female_p, female_std_err = None, None, None, None, None

# Calculate regression statistics for each gender
try:
    male_data = df[df['Gender'] == 'Male']
    female_data = df[df['Gender'] == 'Female']

    male_slope, male_intercept, male_r, male_p, male_std_err = stats.linregress(
        male_data[x_column], male_data[y_column]
    )

    female_slope, female_intercept, female_r, female_p, female_std_err = stats.linregress(
        female_data[x_column], female_data[y_column]
    )

    # Print statistical results
    print("\n=== REGRESSION ANALYSIS ===")
    print(f"Male regression: Weight = {male_slope:.2f} * Height + {male_intercept:.1f}")
    print(f"  R² = {male_r**2:.3f}, p-value = {male_p:.3e}")
    print(f"Female regression: Weight = {female_slope:.2f} * Height + {female_intercept:.1f}")
    print(f"  R² = {female_r**2:.3f}, p-value = {female_p:.3e}")
    print(f"\nDataset summary: {len(df)} total points ({n_male} male, {n_female} female)")

except Exception as e:
    print(f"Note: Statistical analysis could not be completed - {str(e)}")

# === PLOT CREATION ===
# Create figure with proper margins
fig, ax = plt.subplots(figsize=figsize)
plt.subplots_adjust(top=0.92, bottom=0.12, left=0.12, right=0.95)

# Plot scatter points with redundant encoding (color + shape)
male_data = df[df['Gender'] == 'Male']
female_data = df[df['Gender'] == 'Female']

ax.scatter(male_data[x_column], male_data[y_column],
           c=male_color, marker=male_marker, alpha=alpha,
           s=60, label='Male', edgecolors='white', linewidth=0.5)

ax.scatter(female_data[x_column], female_data[y_column],
           c=female_color, marker=female_marker, alpha=alpha,
           s=60, label='Female', edgecolors='white', linewidth=0.5)

# Add regression lines if enabled
if show_regression and male_slope is not None and female_slope is not None:
    # Generate x values for regression lines
    x_range = np.linspace(df[x_column].min(), df[x_column].max(), 100)

    # Male regression line
    male_y_pred = male_slope * x_range + male_intercept
    ax.plot(x_range, male_y_pred, color=male_color, linestyle='--',
            linewidth=2, alpha=0.8, label=f'Male trend (R²={male_r**2:.2f})')

    # Female regression line
    female_y_pred = female_slope * x_range + female_intercept
    ax.plot(x_range, female_y_pred, color=female_color, linestyle='--',
            linewidth=2, alpha=0.8, label=f'Female trend (R²={female_r**2:.2f})')

# === PLOT STYLING ===
# Set labels and title
ax.set_xlabel('Height (cm)', fontsize=label_fontsize)
ax.set_ylabel('Weight (kg)', fontsize=label_fontsize)
ax.set_title('Weight increases with height for both genders, males show stronger correlation',
             fontsize=title_fontsize, pad=20)

# Set tick label sizes
ax.tick_params(labelsize=label_fontsize)

# Add grid for better readability
ax.grid(True, alpha=0.3, linestyle='-', linewidth=0.5)

# Add legend with proper positioning
legend = ax.legend(loc='upper left', fontsize=label_fontsize-2,
                   framealpha=0.9, edgecolor='gray', fancybox=True)


# Set axis limits with some padding
x_min, x_max = df[x_column].min(), df[x_column].max()
y_min, y_max = df[y_column].min(), df[y_column].max()
ax.set_xlim(x_min - 5, x_max + 5)
ax.set_ylim(y_min - 5, y_max + 5)

# Apply tight layout
plt.tight_layout()

# Display the plot
plt.show()
# END-OF-CODEOpens the Analyze page with this code pre-loaded and ready to execute
Console Output
Correlation: 0.891
R-squared: 0.794
P-value: < 0.001
Regression equation: Weight = 0.599*Height - 50.234
Common Use Cases
- 1Correlation analysis between metrics
- 2Cluster identification in data
- 3Outlier detection
- 4Regression modeling
Pro Tips
Use transparency for overlapping points
Add marginal distributions for context
Include regression line with confidence interval
Frequently asked questions
When should you use a scatterplot?
Scatter plots show the relationship between two quantitative variables by plotting data points on a two-dimensional grid. They're fundamental for identifying correlations, clusters, and outliers in your data. Common applications include correlation analysis between metrics, cluster identification in data, and outlier detection.
Which Python libraries can create a scatterplot?
A scatterplot can be built in Python with matplotlib, seaborn, and plotly — matplotlib for precise control over axes, annotations, and journal styling, seaborn for statistically-aware defaults on tidy data, and Plotly for interactive hover, zoom, and web sharing. In Plotivy you describe the figure and it writes the matplotlib code for you.
Can I make a scatterplot without writing Python code?
Yes. Describe the scatterplot you need in plain language and upload your dataset — Plotivy's AI writes the Python code and renders a publication-ready figure. You still get the full, editable matplotlib source, so nothing is locked in a black box.
What are best practices for a clear scatterplot?
Use transparency for overlapping points. Add marginal distributions for context.
Long-tail keyword opportunities
High-intent chart variations
Library comparison for this chart
matplotlib
Best when you need full control over axis formatting, annotation placement, and journal-specific styling for scatter-plot.
seaborn
Fastest path to statistically-aware defaults and tidy-data workflows, especially for grouped and distribution-focused scatter-plot views.
plotly
Best for interactive hover, zoom, and web sharing when collaborators need to inspect values directly from scatter-plot figures.
Scientific Chart Selection Cheat Sheet
Not sure whether to use a Violin Plot, Box Plot, or Ridge Plot? Download our single-page reference mapping the most-used scientific chart types, exactly when to use them, and the core Matplotlib/Seaborn functions.