Lab Data Plotting Guide: From Measurements to Publication Figures

You have a spreadsheet of lab measurements. Now what? Whether it is time-series drug release data, enzyme kinetics, or group comparisons, turning raw numbers into clean, publication-quality figures requires a consistent workflow.
This guide walks you through choosing the right plot type, adding error bars correctly, fitting models, and exporting - all with interactive Python code you can modify and run.
What You Will Learn
0.Live Code Lab: Lab Data Workflow
1.Common Lab Data Types
2.6-Step Plotting Workflow
3.Error Bars: SD vs SEM vs CI
4.Curve Fitting Models
5.Live Code: Curve Fitting
6.Common Mistakes
0. Live Code Lab: Lab Data Workflow
A complete lab data workflow: simulate replicate measurements, calculate SEM, and plot means with error bars across multiple conditions. Edit the code to use your own data.
1. Common Lab Data Types
Time-Series
Drug release kinetics, growth curves, degradation. Plot: line + error bars.
Dose-Response
IC50, EC50 curves. Plot: scatter + 4-parameter logistic fit.
Spectroscopic
UV-Vis, FTIR, NMR, fluorescence spectra. Plot: line or stacked spectra.
Group Comparisons
Control vs treatment. Plot: bar + individual points, or violin/box.
Correlation
Calibration curves, two-variable relationships. Plot: scatter + regression.
Categorical Counts
Cell type frequencies, colony counts. Plot: grouped bar or stacked bar.
2. 6-Step Plotting Workflow
Prepare your CSV
One column per variable, one row per measurement. Include a 'condition' or 'group' column. Clean headers with no spaces.
Upload to Plotivy (or load in Python)
Drag your CSV into the analyze page. The data preview confirms correct parsing.
Choose the right plot type
Bar chart for group comparisons, line for time-series, scatter for correlations. Check section 1 above.
Add error bars
Always show variability. Use SEM for comparing means or SD for describing spread. See section 3 below.
Fit a model if needed
Linear regression, exponential decay, or Michaelis-Menten. Report the fitted equation and R-squared.
Export at publication quality
Use PDF for line art, PNG at 600 DPI for photos. Set correct figure width for your target journal.
3. Error Bars: SD vs SEM vs CI
Try it
Try it now: review your figure before submission
Upload your current plot and get an AI critique with concrete fixes for clarity, typography, color, and journal readiness.
Open AI Figure Reviewer →Newsletter
Get a weekly Python plotting tip
One concise tip each week for cleaner, faster scientific figures. Built for researchers who publish.
Choosing the wrong error bar type is one of the most common mistakes in published figures. Here is when to use each:
| Type | Shows | Use When | Formula |
|---|---|---|---|
| SD | Data spread | Describing variability of individual measurements | sqrt(sum((x-mean)^2)/(n-1)) |
| SEM | Precision of mean | Comparing means between groups | SD / sqrt(n) |
| 95% CI | Confidence range | Statistical inference - if CIs do not overlap, likely significant | mean +/- 1.96 * SEM |
Key Rule
Always state which error bar type you used in the figure caption. A figure with error bars but no caption explaining whether they are SD, SEM, or CI is incomplete and will likely be flagged by reviewers.
4. Curve Fitting Models
Linear
y = mx + bCalibration curves, Beer-Lambert, standard curves
Exponential Decay
y = A*e^(-kx) + CDrug clearance, radioactive decay, fluorescence lifetime
Michaelis-Menten
v = Vmax*[S]/(Km+[S])Enzyme kinetics, receptor binding
4-Parameter Logistic
y = D+(A-D)/(1+(x/C)^B)Dose-response (IC50/EC50), ELISA standard curves
5. Live Code: Three Curve Fits
Three common lab curve fits side by side: linear calibration, exponential decay, and Michaelis-Menten enzyme kinetics. Each panel shows the fitted model equation and key parameters.
6. Common Mistakes
No error bars on bar charts
Fix: Always show variability. Use SEM for comparing means, SD for describing spread.
Using SD with n=3
Fix: With very small n, SD is unreliable. Consider showing all individual data points instead.
Not stating which error bar type
Fix: Every figure caption must say 'error bars represent SEM (n=5)' or similar.
Fitting the wrong model
Fix: Choose the model based on the underlying biology/chemistry, not just R-squared value.
Extrapolating beyond measured range
Fix: Only plot the fitted curve within your data range unless there is theoretical justification.
Chart gallery
Lab-ready chart templates
Start from these gallery templates - each is designed for typical lab data scenarios.

Error Bars
Graphical representations of the variability of data indicating error or uncertainty in measurements.
Sample code / prompt
import numpy as np
import matplotlib.pyplot as plt
from scipy import stats

# Generate bacterial growth data with replicates
np.random.seed(42)
time_points = np.array([0, 4, 8, 12, 18, 24])
mean_values = np.array([10, 25, 80, 250, 600, 800])

# Generate 5 replicates per time point with noise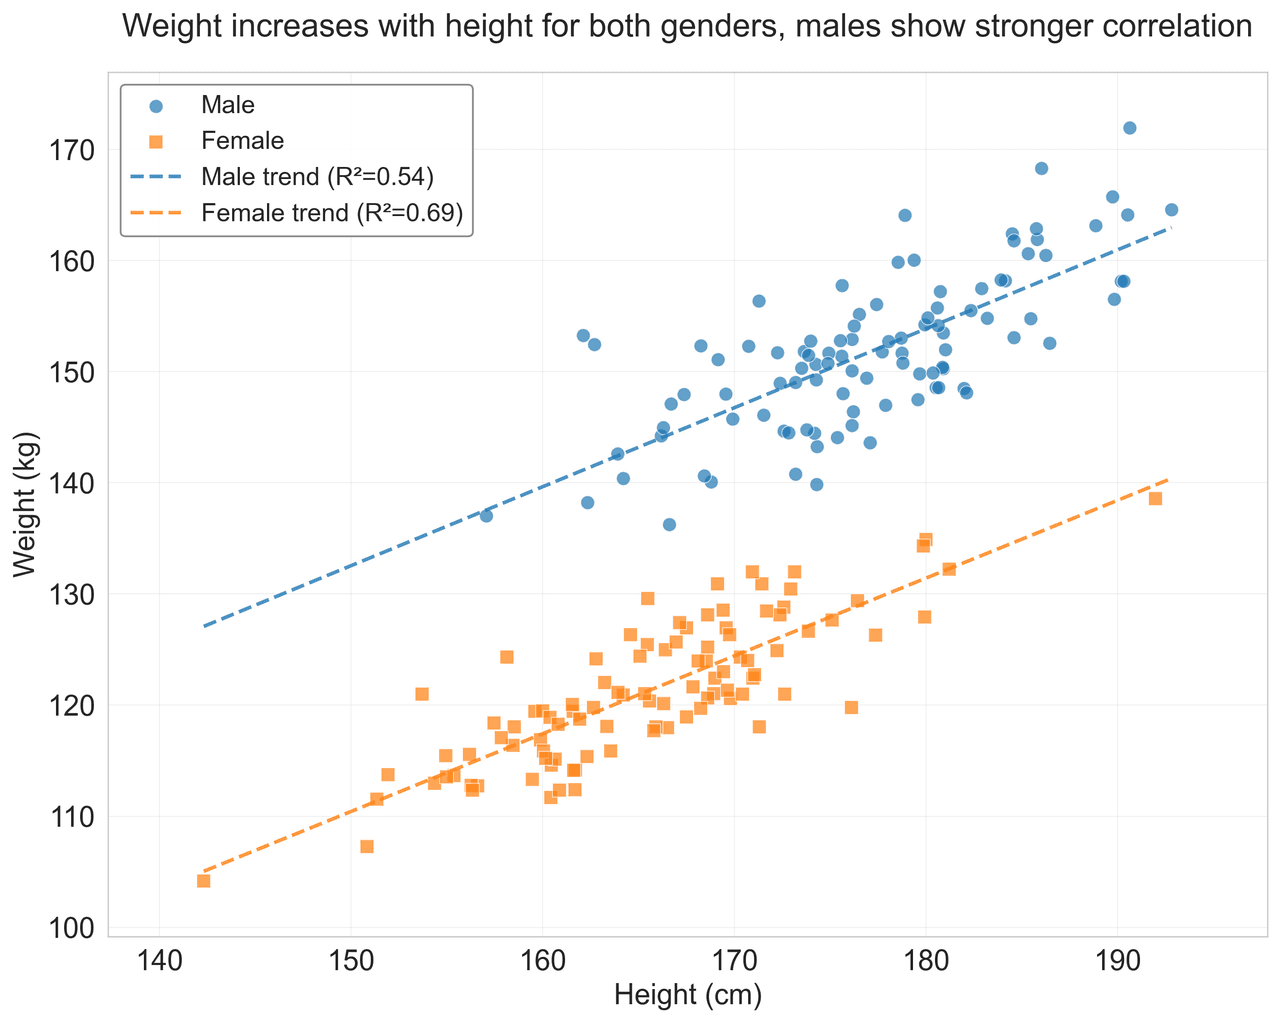
Scatterplot
Displays values for two variables as points on a Cartesian coordinate system.
Sample code / prompt
import matplotlib.pyplot as plt
import numpy as np
from scipy import stats
import pandas as pd

# Generate sample data
np.random.seed(42)
n_samples = 200
height = np.random.normal(170, 8, n_samples)
weight = height * 0.6 + np.random.normal(0, 8, n_samples) - 50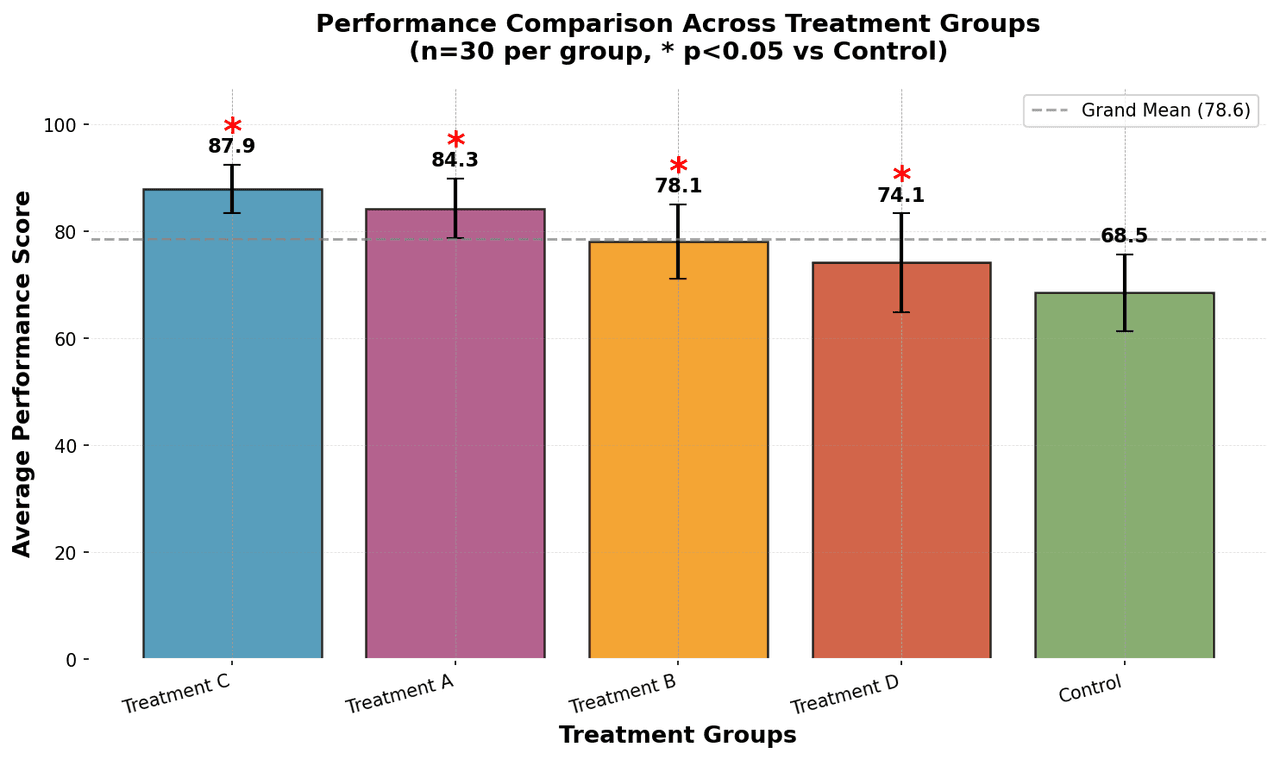
Bar Chart
Compares categorical data using rectangular bars with heights proportional to values.
Sample code / prompt
import numpy as np
import pandas as pd
import matplotlib.pyplot as plt
import seaborn as sns
from scipy import stats

# Generate performance scores for 5 treatment groups
np.random.seed(42)
groups = ['Control', 'Treatment A', 'Treatment B', 'Treatment C', 'Treatment D']
n_samples = 30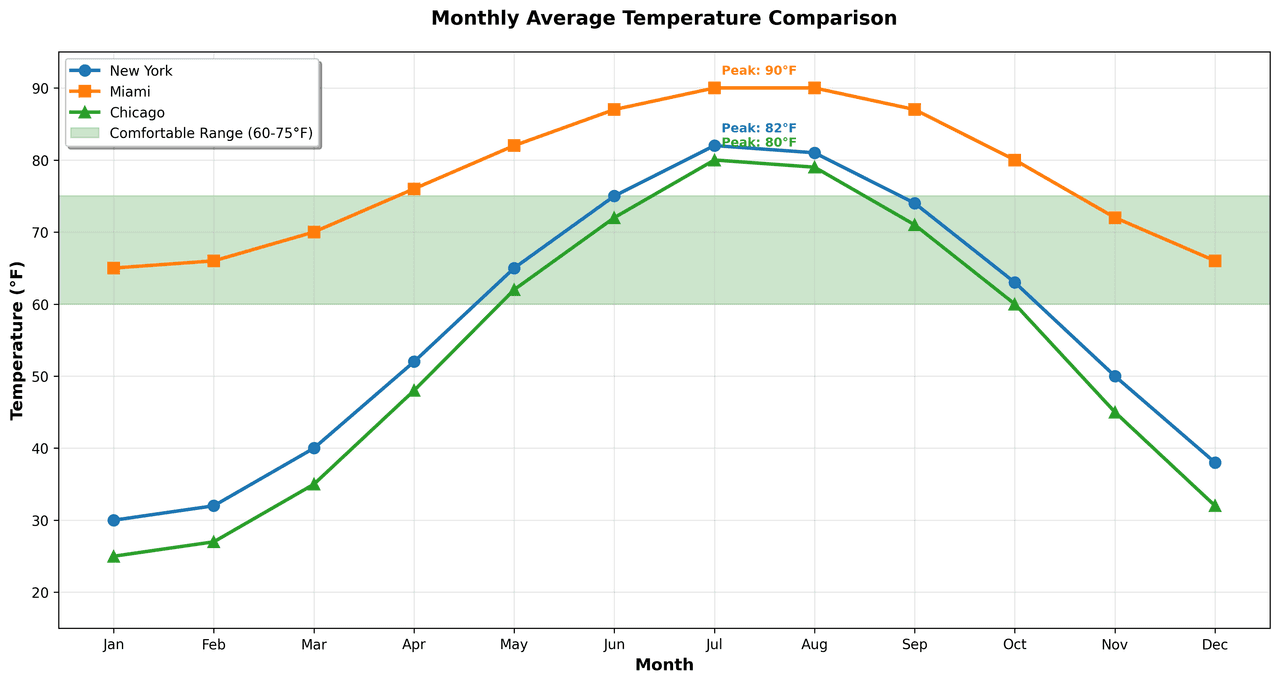
Line Graph
Displays data points connected by straight line segments to show trends over time.
Sample code / prompt
import matplotlib.pyplot as plt
import numpy as np

# Generate temperature data for 3 major US cities over 12 months
months = ['Jan', 'Feb', 'Mar', 'Apr', 'May', 'Jun', 'Jul', 'Aug', 'Sep', 'Oct', 'Nov', 'Dec']
nyc = [30, 32, 40, 52, 65, 75, 82, 81, 74, 63, 50, 38]
miami = [65, 66, 70, 76, 82, 87, 90, 90, 87, 80, 72, 66]
chicago = [25, 27, 35, 48, 62, 72, 80, 79, 71, 60, 45, 32]

# Create figure with enhanced styling.png&w=1280&q=70)
Box and Whisker Plot
Displays data distribution using quartiles, median, and outliers in a standardized format.
Sample code / prompt
import numpy as np
import pandas as pd
import matplotlib.pyplot as plt
import seaborn as sns
from scipy import stats

# Generate gene expression data for 4 genotypes
np.random.seed(42)
genotypes = ['WT', 'KO1', 'KO2', 'Mutant']
n_per_group = 20From Lab Bench to Publication
Upload your CSV, describe what you need, and Plotivy generates publication-quality figures with proper error bars and curve fits automatically.
Technique guides scientists read next
scipy.signal.find_peaks guide
Tune prominence and width parameters for robust peak extraction.
Savitzky-Golay smoothing
Reduce noise while preserving peak shape and position.
PCA visualization workflow
Move from high-dimensional measurements to interpretable components.
ANOVA with post-hoc brackets
Add statistically correct pairwise significance annotations.
Found this helpful? Share it with your network.
Experimental Physicist & Photonics Researcher
Hands-on experience in silicon photonics, semiconductor fabrication (DRIE/ICP-RIE), optical simulation, and data-driven analysis. Built Plotivy to help researchers focus on discoveries instead of data struggles.
More about the authorVisualize your own data
Apply the techniques from this article to your own datasets. Upload CSV, Excel, or paste data directly.