Error Bars
Chart overview
Error bars are graphical representations of data variability that indicate the uncertainty in reported measurements.
Key points
- They can represent standard deviation, standard error, confidence intervals, or other measures of spread.
- Error bars are essential in scientific visualization for communicating the precision and reliability of experimental results.
- The single most important rule: state in the caption what the bars show and the n, because SD, SEM, and 95% CI differ by factors of sqrt(n) and readers cannot tell them apart visually.
Practical guidance
Choose by message - SD describes spread in the data, SEM describes precision of the mean (and shrinks with n, which can make noisy data look clean), and a 95% CI supports inference. In matplotlib, plt. errorbar(x, y, yerr=err, capsize=3, fmt='o') draws symmetric bars; pass yerr as a [lower, upper] pair for asymmetric intervals, which are mandatory on log-scale axes and for ratio measures where symmetric bars can absurdly cross zero. bar(... , yerr=... ) works for bar charts, but for small samples, plotting the raw jittered points next to the mean and CI is more honest than any bar. Finally, two overlapping 95% CIs do not prove non-significance and two non-overlapping SEM bars do not prove significance - if the figure's job is a comparison, annotate the actual test result rather than letting readers eyeball it.
Create a Error Bars with your data using AI — no coding required.
Further reading
How to Create a Bar Chart in Python
Matplotlib, seaborn, and plotly patterns for grouped bars, error bars, and publication-ready labels.
Read the guideExample Visualization
Create This Chart Now
Generate publication-ready error barss with AI in seconds. No coding required – just describe your data and let AI do the work.
View example prompt
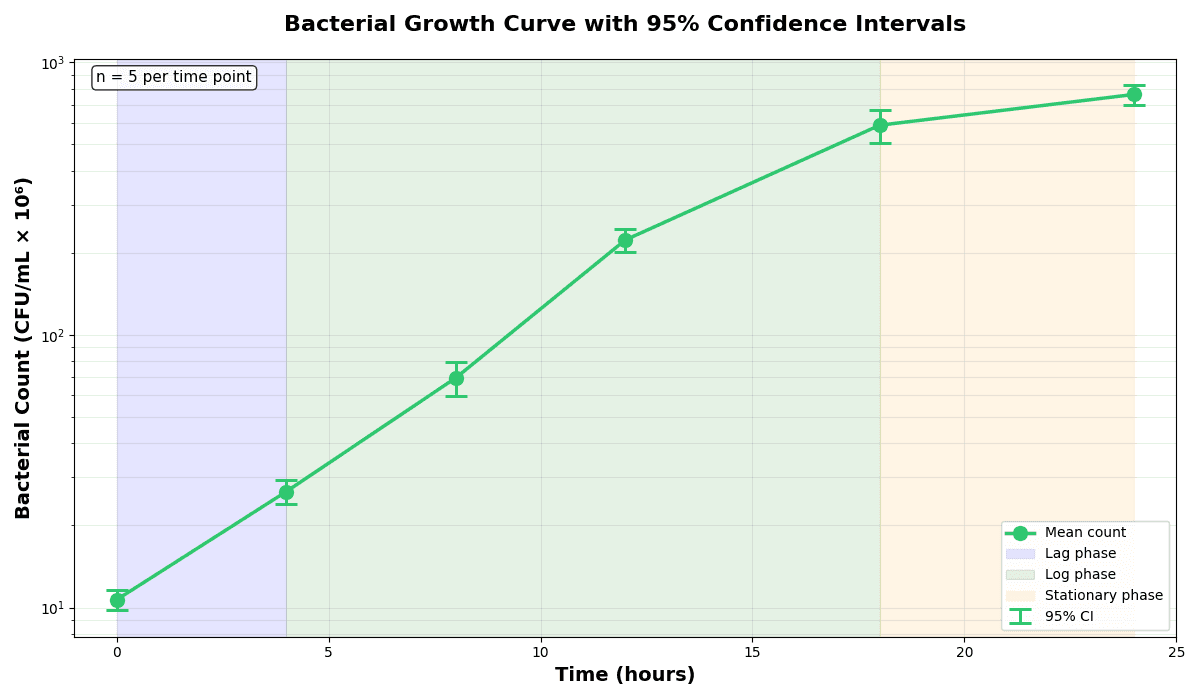
"Create a line graph with error bars showing 'Bacterial Growth' over 24 hours for a biology experiment. Generate data at 6 time points (0, 4, 8, 12, 18, 24 hours) with 5 replicates per time point. Means should follow exponential growth: 10, 25, 80, 250, 600, 800 (CFU/mL × 10⁶). Calculate 95% confidence intervals from the replicates. Plot mean values as connected line with circular markers. Show error bars as vertical lines with caps. Add horizontal gridlines. Log-scale Y-axis to show exponential phase clearly. Annotate the lag, log, and stationary phases. X-axis: 'Time (hours)', Y-axis: 'Bacterial Count (CFU/mL × 10⁶)'. Add sample size annotation (n=5 per time point)."
How to create this chart with your data
Upload Data
Upload your Excel or CSV file. Data used to generate charts is sent to Plotivy's server for processing.
AI Generation
Our AI analyzes your data and generates the Error Bars code automatically.
Customize & Export
Tweak the design with natural language, then export as high-res PNG, SVG or PDF.
Newsletter
Get one weekly tip for better error barss
Join researchers receiving concise Python plotting techniques to improve chart clarity and reduce revision cycles.
Python Code Example
# === IMPORTS ===
import pandas as pd
import numpy as np
import matplotlib.pyplot as plt

# === USER-EDITABLE PARAMETERS ===
title = "Bacterial Growth Curve with 95% Confidence Intervals"
figsize = (12, 7)

# === EXAMPLE DATASET ===
np.random.seed(42)

# Time points (hours)
time_points = [0, 4, 8, 12, 18, 24]
# Mean bacterial counts (CFU/mL × 10⁶) - exponential growth pattern
means = [10, 25, 80, 250, 600, 800]
n_replicates = 5

# Generate replicate data
data = []
for t, mean in zip(time_points, means):
    # Add variability (coefficient of variation ~15%)
    std = mean * 0.15
    replicates = np.random.normal(mean, std, n_replicates)
    replicates = np.maximum(replicates, 1)  # Ensure positive
    for rep in replicates:
        data.append({'Time': t, 'Count': rep})

df = pd.DataFrame(data)

# Calculate statistics
stats = df.groupby('Time')['Count'].agg(['mean', 'std', 'count'])
stats['se'] = stats['std'] / np.sqrt(stats['count'])
stats['ci95'] = stats['se'] * 1.96  # 95% CI

# Print summary
print("=== Bacterial Growth Statistics ===")
print(f"\nTime (h)  |  Mean ± 95% CI (CFU/mL × 10⁶)")
print("-" * 45)
for t in time_points:
    row = stats.loc[t]
    print(f"   {t:2d}     |  {row['mean']:6.1f} ± {row['ci95']:.1f}")
print(f"\nReplicates per time point: {n_replicates}")
print(f"Total observations: {len(df)}")

# === CREATE PLOT ===
fig, ax = plt.subplots(figsize=figsize)

# Plot mean line with markers
ax.plot(time_points, stats['mean'], 'o-', color='#2ecc71', linewidth=2.5,
        markersize=10, label='Mean count', zorder=3)

# Add error bars (95% CI)
ax.errorbar(time_points, stats['mean'], yerr=stats['ci95'],
            fmt='none', color='#27ae60', capsize=8, capthick=2,
            linewidth=2, label='95% CI', zorder=2)

# Add horizontal gridlines
ax.set_yscale('log')
ax.grid(True, alpha=0.3, which='both')

# Phase annotations
ax.axvspan(0, 4, alpha=0.1, color='blue', label='Lag phase')
ax.axvspan(4, 18, alpha=0.1, color='green', label='Log phase')
ax.axvspan(18, 24, alpha=0.1, color='orange', label='Stationary phase')

# Labels and title
ax.set_xlabel('Time (hours)', fontsize=14, fontweight='bold')
ax.set_ylabel('Bacterial Count (CFU/mL × 10⁶)', fontsize=14, fontweight='bold')
ax.set_title(title, fontsize=16, fontweight='bold', pad=20)

# Add sample size annotation
ax.annotate(f'n = {n_replicates} per time point', xy=(0.02, 0.98), xycoords='axes fraction',
            fontsize=11, verticalalignment='top',
            bbox=dict(boxstyle='round', facecolor='white', alpha=0.8))

ax.legend(loc='lower right', framealpha=0.9)
ax.set_xlim(-1, 25)

plt.tight_layout()
plt.show()
# END-OF-CODE
Opens the Analyze page with this code pre-loaded and ready to execute
Console Output
Mean values at each time point: [ 10  25  80 250 600 800]
95% CI widths: [17.22 21.48 62.41 185.89 424.68 548.64]
Standard error values: [4.4  5.49 15.95 47.56 108.65 140.39]
Common Use Cases
- 1Scientific data presentation
- 2Experimental results visualization
- 3Quality control charts
- 4Survey data with margins of error
Pro Tips
State whether the bars show standard deviation, standard error, or a confidence interval
Report the sample size so readers can interpret the uncertainty
Use asymmetric error bars for log scales or intervals that are not symmetric
Show raw data points alongside summaries when the sample is small
Frequently asked questions
When should you use an error bars?
Error bars are graphical representations of data variability that indicate the uncertainty in reported measurements. They can represent standard deviation, standard error, confidence intervals, or other measures of spread. Common applications include scientific data presentation, experimental results visualization, and quality control charts.
Which Python libraries can create an error bars?
An error bars can be built in Python with matplotlib — matplotlib for precise control over axes, annotations, and journal styling. In Plotivy you describe the figure and it writes the matplotlib code for you.
Can I make an error bars without writing Python code?
Yes. Describe the error bars you need in plain language and upload your dataset — Plotivy's AI writes the Python code and renders a publication-ready figure. You still get the full, editable matplotlib source, so nothing is locked in a black box.
What are best practices for a clear error bars?
State whether the bars show standard deviation, standard error, or a confidence interval. Report the sample size so readers can interpret the uncertainty.
Library comparison for this chart
matplotlib
Best when you need full control over axis formatting, annotation placement, and journal-specific styling for error-bars.
Scientific Chart Selection Cheat Sheet
Not sure whether to use a Violin Plot, Box Plot, or Ridge Plot? Download our single-page reference mapping the most-used scientific chart types, exactly when to use them, and the core Matplotlib/Seaborn functions.