Physics Data Analysis & Visualization Guide

Physics data demands precision in both analysis and presentation. From spectroscopy peaks to electromagnetic field simulations, the visualizations in your paper must communicate complex phenomena clearly and accurately.
This guide covers the techniques that actually work for physics data - and lets you practice each one instantly with live Python editors. No installation, no boilerplate.
What You'll Learn
0.Live Code Lab: Photoelectric Effect
1.Spectral Data (UV-Vis, PL, Raman)
2.Pendulum Motion & Time Series
3.Magnetic Hysteresis Loops
4.3D Surface Plots & Contours
5.Vector Fields (Quiver Plots)
6.Phase Diagrams
7.LaTeX Integration & Export
0. Live Code Lab: Photoelectric Effect
A classic physics experiment: plotting stopping voltage vs frequency to extract Planck's constant. The code below performs a linear fit, computes R-squared, and annotates the equation directly on the plot.
Edit the data points or add error bars to experiment with the fit quality.
1. Spectral Data (UV-Vis, PL, Raman)
Spectra are the bread and butter of many physics experiments. The challenge is often showing fine details in the presence of large background signals.
Inset Plots for Fine Structure
If you have a large peak and a small but important feature elsewhere, use an inset plot (zoom-in) to show the detail without breaking the axis.
Try with Raman dataStacked Offset Spectra
Compare multiple spectra by vertically offsetting them. Each curve is shifted by a constant, allowing visual comparison of peak positions and intensities.
Try with UV-Vis data2. Pendulum Motion & Damped Oscillations
Time-series oscillation data is ubiquitous in physics labs. This code generates a damped sinusoid and overlays the exponential decay envelope - a standard publication technique.
Modify the damping coefficient or frequency to see how the plot changes.
3. Magnetic Hysteresis Loops
Hysteresis loops are fundamental to characterizing ferromagnetic materials. Key parameters - coercivity, remanence, saturation magnetization - should be annotated directly on the plot.
Best Practices
- Plot M vs H with a clear loop direction (arrows along the curve)
- Mark coercivity (Hc) and remanence (Mr) with dotted lines intersecting the axes
- Use smooth interpolation if your data has limited field points
- For multi-temperature studies, use a colormap (cool-to-warm) to encode temperature
Try it
Try it now: detect peaks in your own signal
Upload spectroscopy or signal data and generate a cleaned plot with detected peaks and annotations.
Generate my peak-detection plot →Newsletter
Get a weekly Python plotting tip
One concise tip each week for cleaner, faster scientific figures. Built for researchers who publish.
Try it: Upload your VSM or SQUID data and ask "Plot the hysteresis loop and annotate coercivity and remanence values".
4. 3D Surface Plots & Contour Projections
For visualizing fields, potential energy surfaces, or beam profiles, 3D plots are essential. However, static 3D plots can be misleading if the viewing angle hides data.
Best Practice: Contour Projections
Add contour plots projected onto the XY plane below your 3D surface. This gives the reader a quantitative 2D map of the topology that is easier to read than the 3D shape alone. Always include a colorbar with units.
When to Use 3D
Beam profiles, wavefunctions, potential energy surfaces, temperature fields. Use when the z-dimension adds essential information not conveyed by a heatmap alone.
When to Avoid 3D
If your data is essentially 2D with a color-mapped value, a heatmap or contour plot is always clearer. 3D adds visual complexity without information gain.
5. Vector Fields (Quiver Plots)
Electromagnetism and fluid dynamics require visualizing vector fields. Quiver plots and streamplots are the standard tools.
Color by Magnitude
Do not just use arrow length to indicate magnitude; map color to the vector magnitude as well. This provides a double visual cue that makes field strength much easier to interpret at a glance.
Prompt: "Create a quiver plot of the electric field around a dipole, color arrows by field magnitude using a viridis colormap"
6. Phase Diagrams
Phase diagrams map stability regions as a function of thermodynamic variables (T, P, composition). Use semi-transparent filled regions with distinct boundary lines.
Labeling Strategy
- Label phases directly on the plot region rather than using a legend
- Use distinct textures or colors with high contrast between adjacent phases
- Mark triple points and critical points with special symbols
- Include experimental data points overlaid on the calculated boundaries
7. LaTeX Integration & Export
Physics papers are almost exclusively written in LaTeX. Plotivy supports LaTeX rendering for axis labels and titles, ensuring your equations look perfect.
Pro Tips for Physics Manuscripts
- Use
r"$E = mc^2$"syntax in matplotlib labels for LaTeX rendering - Match figure font to your document font (typically Computer Modern or Times)
- Export as PDF for LaTeX inclusion - it preserves vector quality and fonts
- For dense simulation data, use hexbin plots instead of scatter to avoid ink blobs
Chart gallery
Physics-relevant chart templates
Start from these gallery examples and customize for your specific physics dataset.
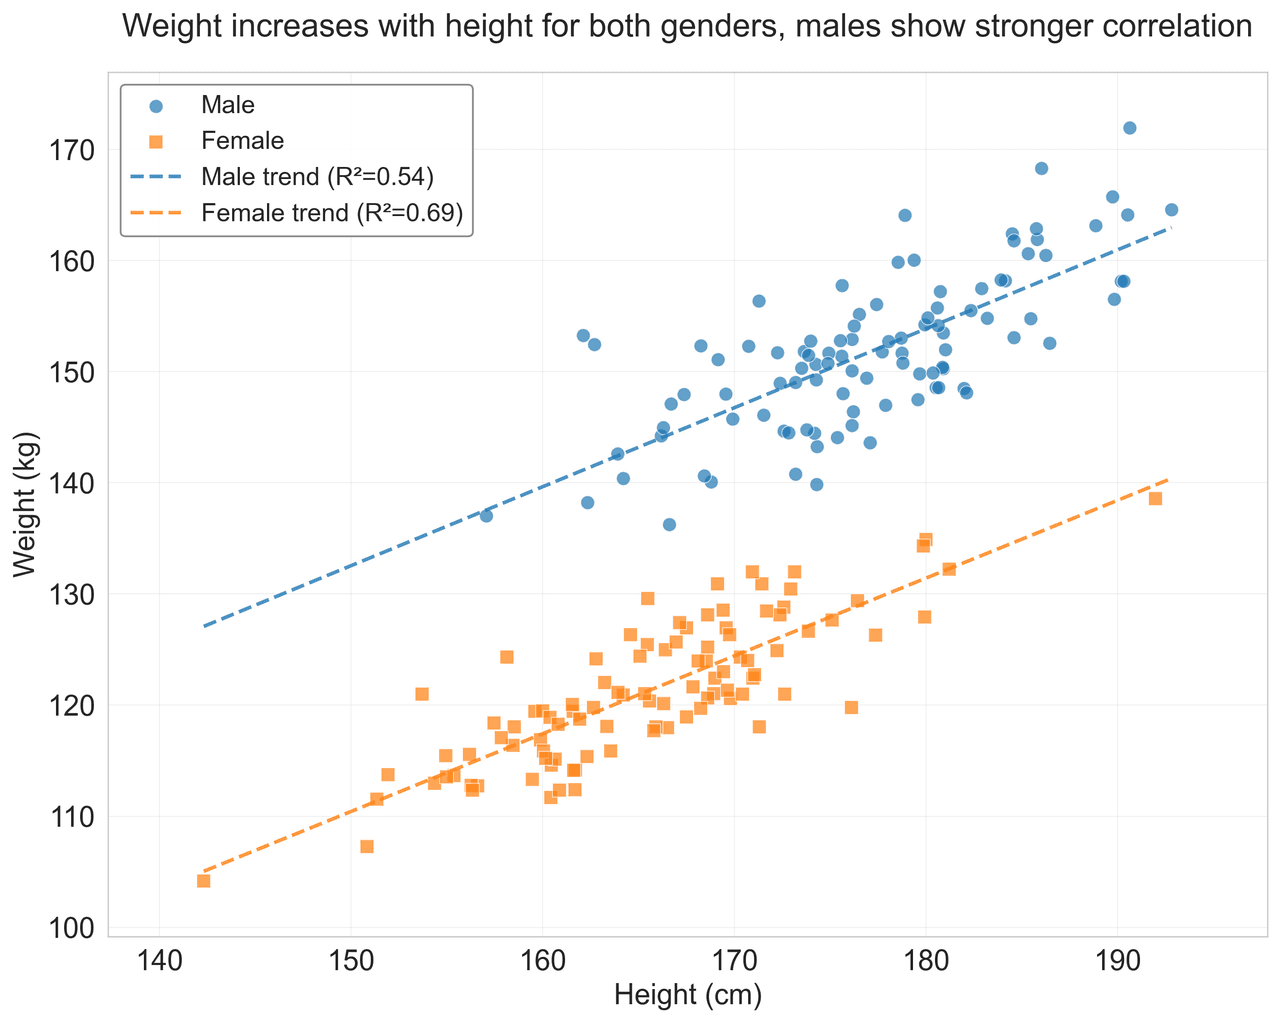
Scatterplot
Displays values for two variables as points on a Cartesian coordinate system.
Sample code / prompt
import matplotlib.pyplot as plt
import numpy as np
from scipy import stats
import pandas as pd

# Generate sample data
np.random.seed(42)
n_samples = 200
height = np.random.normal(170, 8, n_samples)
weight = height * 0.6 + np.random.normal(0, 8, n_samples) - 50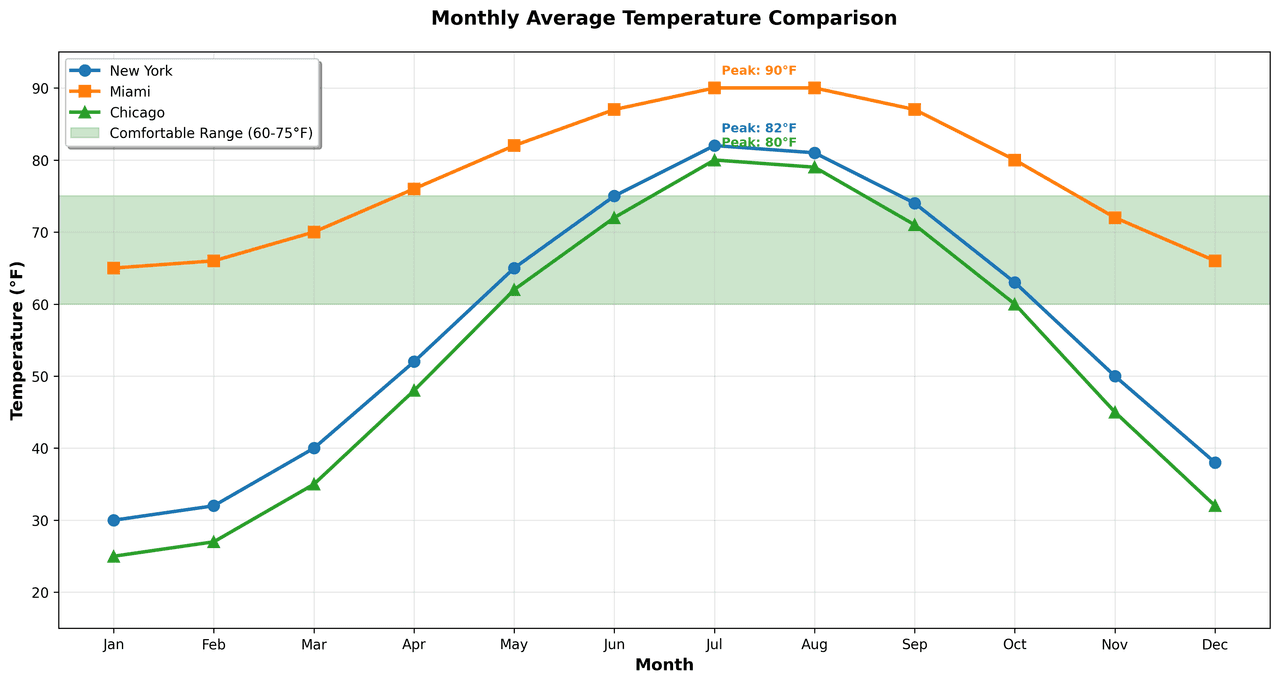
Line Graph
Displays data points connected by straight line segments to show trends over time.
Sample code / prompt
import matplotlib.pyplot as plt
import numpy as np

# Generate temperature data for 3 major US cities over 12 months
months = ['Jan', 'Feb', 'Mar', 'Apr', 'May', 'Jun', 'Jul', 'Aug', 'Sep', 'Oct', 'Nov', 'Dec']
nyc = [30, 32, 40, 52, 65, 75, 82, 81, 74, 63, 50, 38]
miami = [65, 66, 70, 76, 82, 87, 90, 90, 87, 80, 72, 66]
chicago = [25, 27, 35, 48, 62, 72, 80, 79, 71, 60, 45, 32]

# Create figure with enhanced styling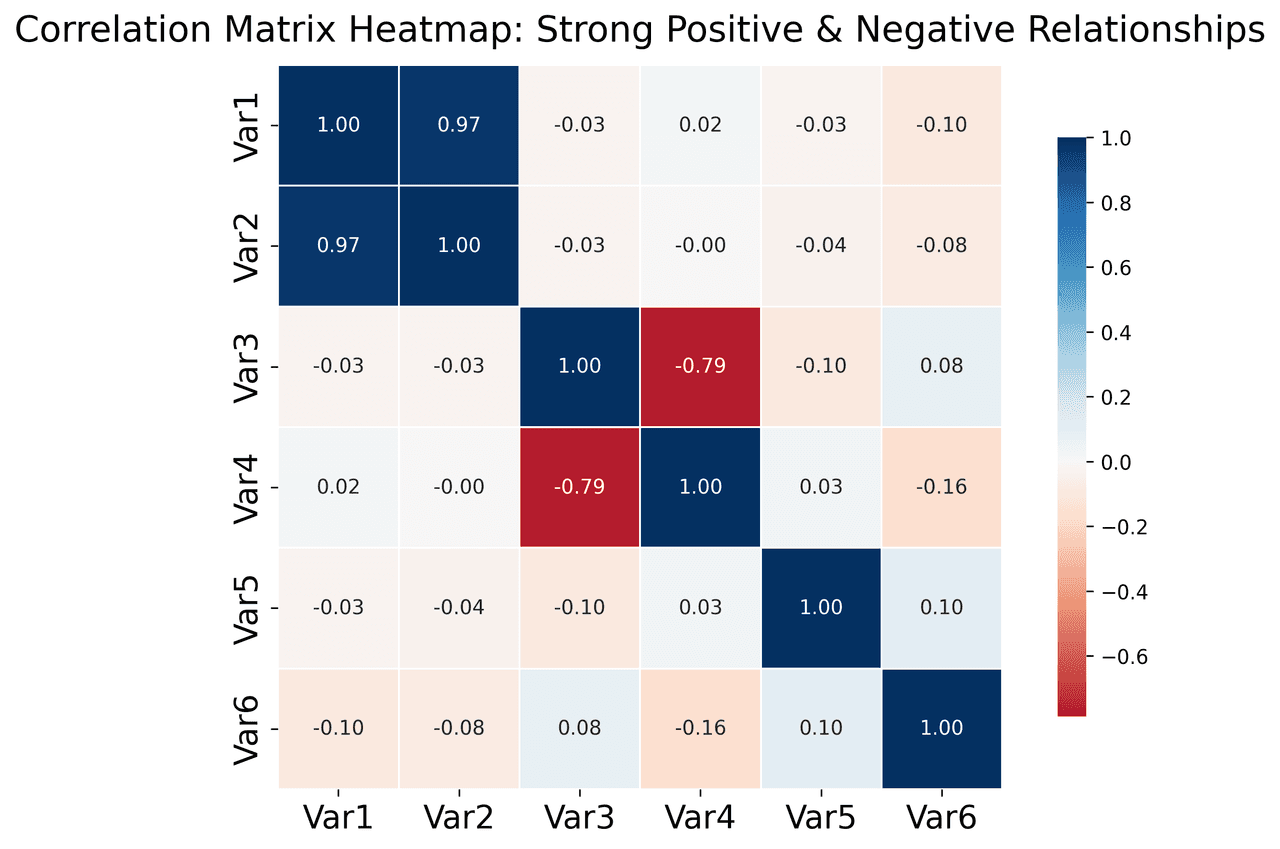
Heatmap
Represents data values as colors in a two-dimensional matrix format.
Sample code / prompt
import matplotlib.pyplot as plt
import seaborn as sns
import pandas as pd
import numpy as np

# Create correlation matrix for financial metrics
metrics = ['Revenue', 'Profit', 'Expenses', 'ROI', 'Customers', 'AOV', 'Marketing', 'Employees']
correlation_data = np.array([
    [1.00, 0.85, -0.45, 0.72, 0.88, 0.65, 0.72, 0.55],
    [0.85, 1.00, -0.78, 0.92, 0.75, 0.58, 0.63, 0.48],
Error Bars
Graphical representations of the variability of data indicating error or uncertainty in measurements.
Sample code / prompt
import numpy as np
import matplotlib.pyplot as plt
from scipy import stats

# Generate bacterial growth data with replicates
np.random.seed(42)
time_points = np.array([0, 4, 8, 12, 18, 24])
mean_values = np.array([10, 25, 80, 250, 600, 800])

# Generate 5 replicates per time point with noiseVisualize Your Physics Data Now
Upload your spectra, oscillation data, or simulation results. Describe the plot you want in plain English and get publication-ready Python code instantly.
Technique guides scientists read next
scipy.signal.find_peaks guide
Tune prominence and width parameters for robust peak extraction.
Savitzky-Golay smoothing
Reduce noise while preserving peak shape and position.
PCA visualization workflow
Move from high-dimensional measurements to interpretable components.
ANOVA with post-hoc brackets
Add statistically correct pairwise significance annotations.
Found this helpful? Share it with your network.
Experimental Physicist & Photonics Researcher
Hands-on experience in silicon photonics, semiconductor fabrication (DRIE/ICP-RIE), optical simulation, and data-driven analysis. Built Plotivy to help researchers focus on discoveries instead of data struggles.
More about the authorVisualize your own data
Apply the techniques from this article to your own datasets. Upload CSV, Excel, or paste data directly.