From Raw Data to Publication: The Complete Research Workflow in 2026

Every published figure starts as a messy CSV. This guide walks through the complete workflow - from organizing your raw data to submitting publication-ready figures - with reproducible Python code at each step.
What You'll Learn
0.Live Code: Publication Multi-Panel
1.Phase 1 - Data Collection & Organization
2.Phase 2 - Cleaning & Validation
3.Phase 3 - Analysis & Statistics
4.Phase 4 - Visualization & Figures
5.Phase 5 - Export & Submission
0. Live Code: Publication Multi-Panel
The end result of the workflow: a 4-panel publication figure with time series, dose-response, correlation, and distribution panels. Edit the code and re-run.
1. Phase 1 - Data Collection & Organization
Folder structure template
project/
├── data/
│   ├── raw/          # Never modify raw data files
│   ├── processed/    # Cleaned, transformed data
│   └── metadata/     # Experiment logs, protocols
├── figures/
│   ├── exploratory/  # Quick plots for yourself
│   └── publication/  # Final figures for the paper
├── scripts/
│   ├── 01_clean.py
│   ├── 02_analyze.py
│   └── 03_visualize.py
└── README.md
Never modify raw data
Keep originals in data/raw/. All transformations go to data/processed/.
Use descriptive filenames
experiment_2025-01-15_dosage-response.csv, not data2.csv.
Include metadata
Record units, instrument settings, operator, date in a companion file.
Version everything
Use Git. Even for data analysis scripts. Especially for data analysis scripts.
2. Phase 2 - Cleaning & Validation
Try it
Try it now: review your figure before submission
Upload your current plot and get an AI critique with concrete fixes for clarity, typography, color, and journal readiness.
Open AI Figure Reviewer →Newsletter
Get a weekly Python plotting tip
One concise tip each week for cleaner, faster scientific figures. Built for researchers who publish.
Essential cleaning operations
import pandas as pd

df = pd.read_csv("data/raw/experiment.csv")

# 1. Check for missing values
print(df.isnull().sum())

# 2. Remove duplicates
df = df.drop_duplicates()

# 3. Fix data types
df["date"] = pd.to_datetime(df["date"])
df["concentration"] = pd.to_numeric(df["concentration"], errors="coerce")

# 4. Outlier detection (IQR method)
Q1, Q3 = df["value"].quantile([0.25, 0.75])
IQR = Q3 - Q1
mask = (df["value"] >= Q1 - 1.5*IQR) & (df["value"] <= Q3 + 1.5*IQR)
df_clean = df[mask]

# 5. Save cleaned data (never overwrite raw!)
df_clean.to_csv("data/processed/experiment_clean.csv", index=False)
Validation checklist
- No missing values in key columns
- Data types are correct (numeric, datetime, categorical)
- Value ranges are physically plausible
- Sample sizes match experiment protocol
- Units are consistent across all measurements
3. Phase 3 - Analysis & Statistics
t-test
Compare 2 groups
Normal distribution, equal variance
ANOVA
Compare 3+ groups
Normal distribution, homoscedasticity
Pearson r
Linear correlation
Bivariate normality
Mann-Whitney U
Non-normal 2-group
Ordinal data, independent
Chi-square
Categorical association
Expected count >= 5
Linear regression
Predict Y from X
Linearity, independence
4. Phase 4 - Visualization & Figures
One message per figure
Each figure should communicate exactly one key finding.
Label everything
Axis labels with units, legend, title, and panel letters (A, B, C).
Use consistent styling
Same fonts, colors, and line widths across all figures in your paper.
Match journal specs
Width (single/double column), DPI (300+), font size (8-12 pt), file format.
Include statistical annotations
p-values, confidence intervals, R-squared on the figure itself.
5. Phase 5 - Export & Submission
Export code template
# Save in multiple formats for different uses
fig.savefig("figures/publication/figure_1.pdf",
            dpi=600, bbox_inches="tight", facecolor="white")
fig.savefig("figures/publication/figure_1.tiff",
            dpi=300, bbox_inches="tight", facecolor="white")
fig.savefig("figures/publication/figure_1.png",
            dpi=600, bbox_inches="tight", facecolor="white")

# PDF  -> Vector, best for journal submission
# TIFF -> Required by some journals (Nature, Science)
# PNG  -> For presentations and web
Reproducibility checklist
- All scripts run from raw data to final figures without manual steps
- Package versions recorded (pip freeze, conda env export)
- Random seeds set for any stochastic operations
- README explains how to reproduce every figure
- Data and code deposited in a DOI-backed repository
Chart gallery
Chart Types for Your Publication
Every chart type used in scientific publications, ready to generate.
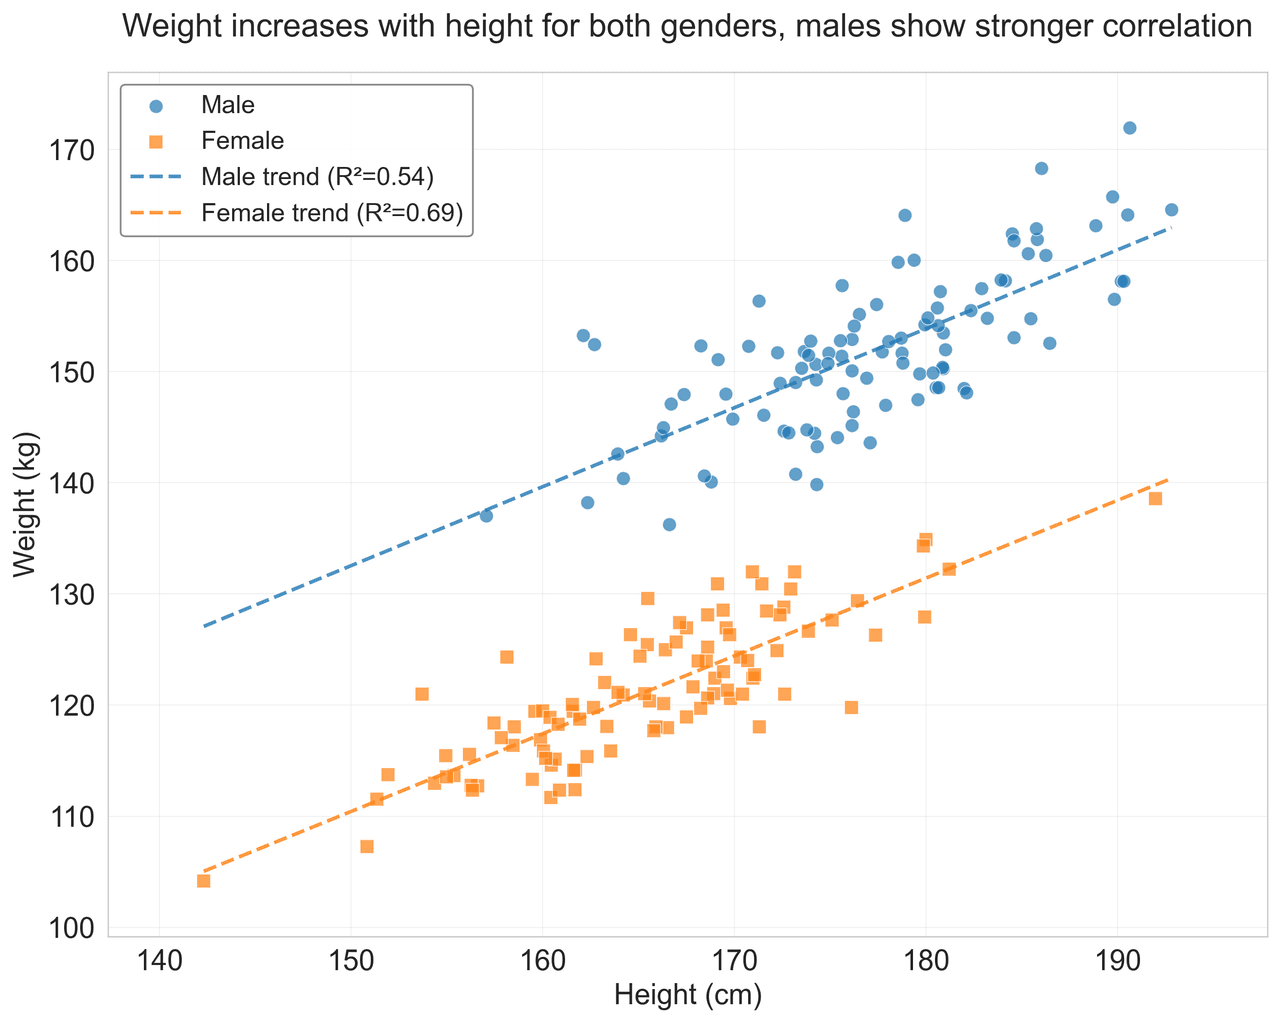
Scatterplot
Displays values for two variables as points on a Cartesian coordinate system.
Sample code / prompt
import matplotlib.pyplot as plt
import numpy as np
from scipy import stats
import pandas as pd

# Generate sample data
np.random.seed(42)
n_samples = 200
height = np.random.normal(170, 8, n_samples)
weight = height * 0.6 + np.random.normal(0, 8, n_samples) - 50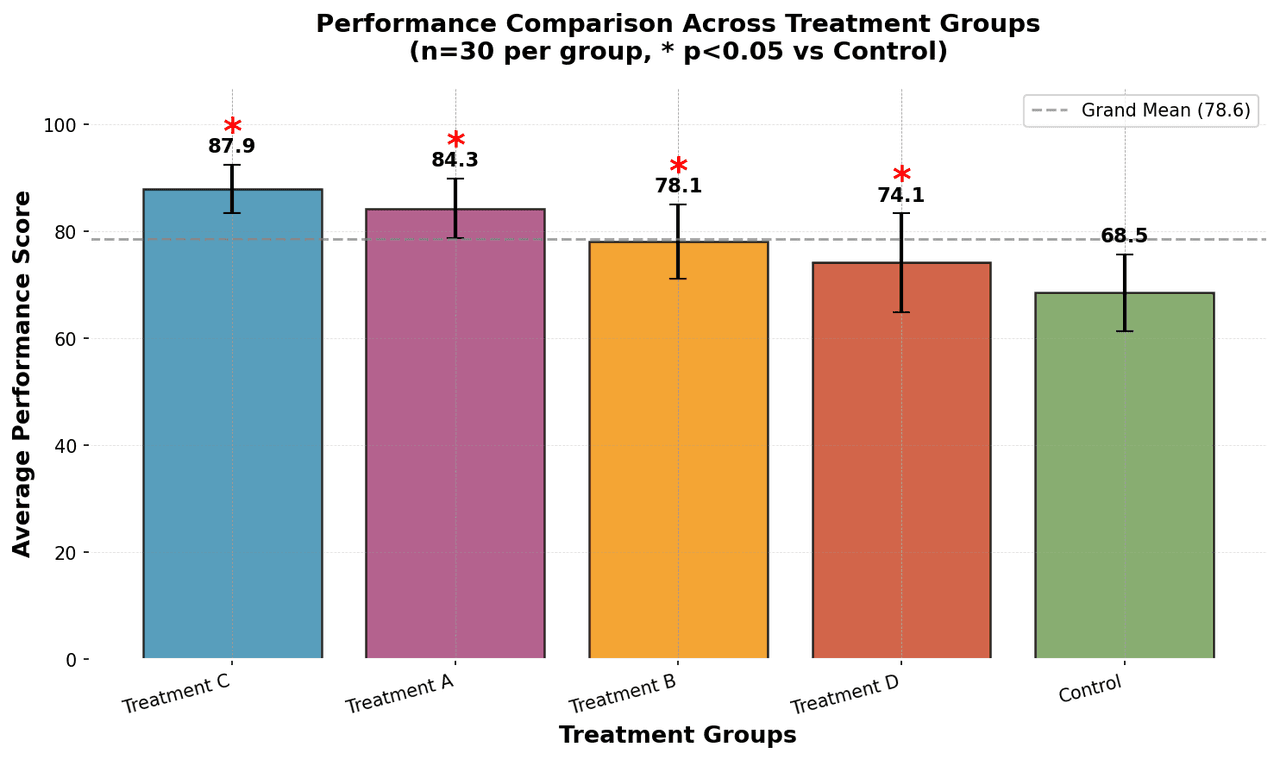
Bar Chart
Compares categorical data using rectangular bars with heights proportional to values.
Sample code / prompt
import numpy as np
import pandas as pd
import matplotlib.pyplot as plt
import seaborn as sns
from scipy import stats

# Generate performance scores for 5 treatment groups
np.random.seed(42)
groups = ['Control', 'Treatment A', 'Treatment B', 'Treatment C', 'Treatment D']
n_samples = 30
Error Bars
Graphical representations of the variability of data indicating error or uncertainty in measurements.
Sample code / prompt
import numpy as np
import matplotlib.pyplot as plt
from scipy import stats

# Generate bacterial growth data with replicates
np.random.seed(42)
time_points = np.array([0, 4, 8, 12, 18, 24])
mean_values = np.array([10, 25, 80, 250, 600, 800])

# Generate 5 replicates per time point with noise.png&w=1280&q=70)
Box and Whisker Plot
Displays data distribution using quartiles, median, and outliers in a standardized format.
Sample code / prompt
import numpy as np
import pandas as pd
import matplotlib.pyplot as plt
import seaborn as sns
from scipy import stats

# Generate gene expression data for 4 genotypes
np.random.seed(42)
genotypes = ['WT', 'KO1', 'KO2', 'Mutant']
n_per_group = 20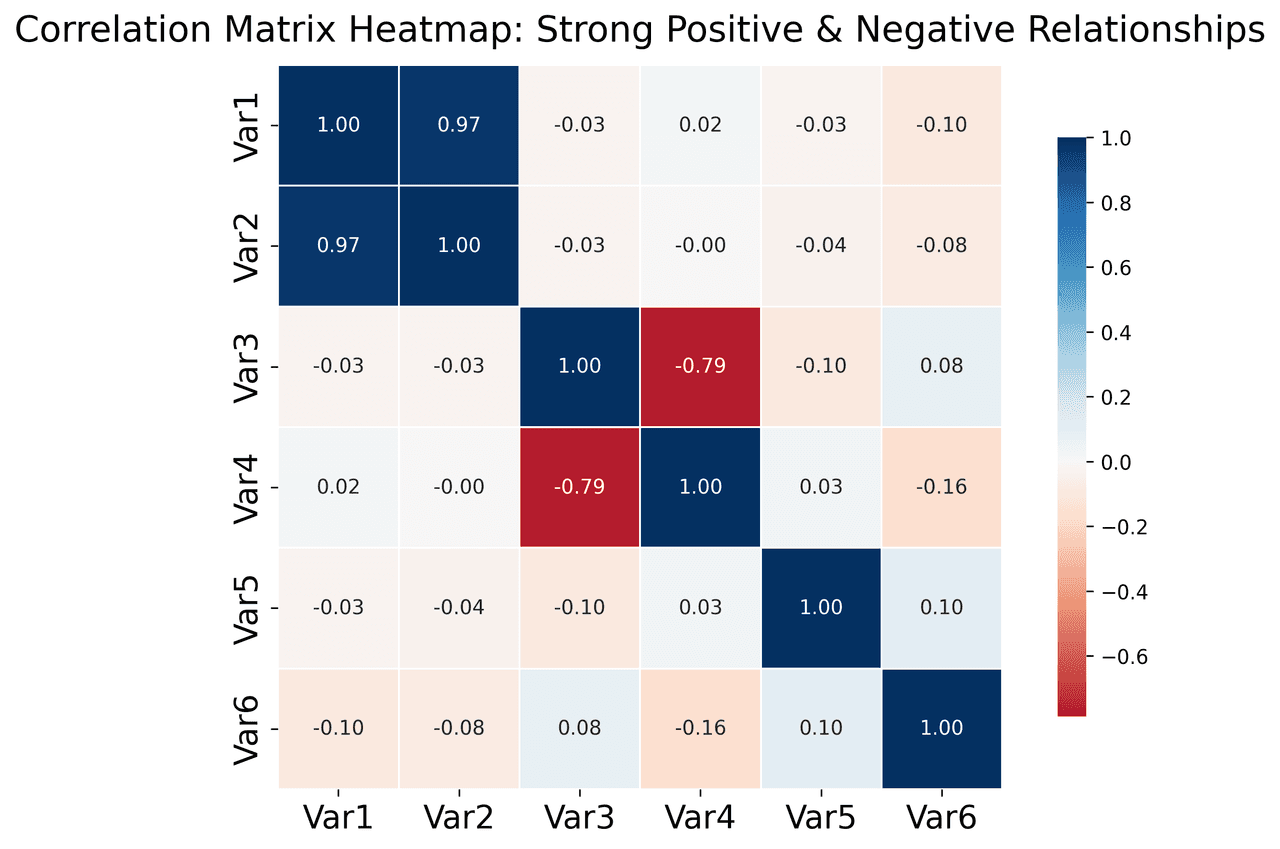
Heatmap
Represents data values as colors in a two-dimensional matrix format.
Sample code / prompt
import matplotlib.pyplot as plt
import seaborn as sns
import pandas as pd
import numpy as np

# Create correlation matrix for financial metrics
metrics = ['Revenue', 'Profit', 'Expenses', 'ROI', 'Customers', 'AOV', 'Marketing', 'Employees']
correlation_data = np.array([
    [1.00, 0.85, -0.45, 0.72, 0.88, 0.65, 0.72, 0.55],
    [0.85, 1.00, -0.78, 0.92, 0.75, 0.58, 0.63, 0.48],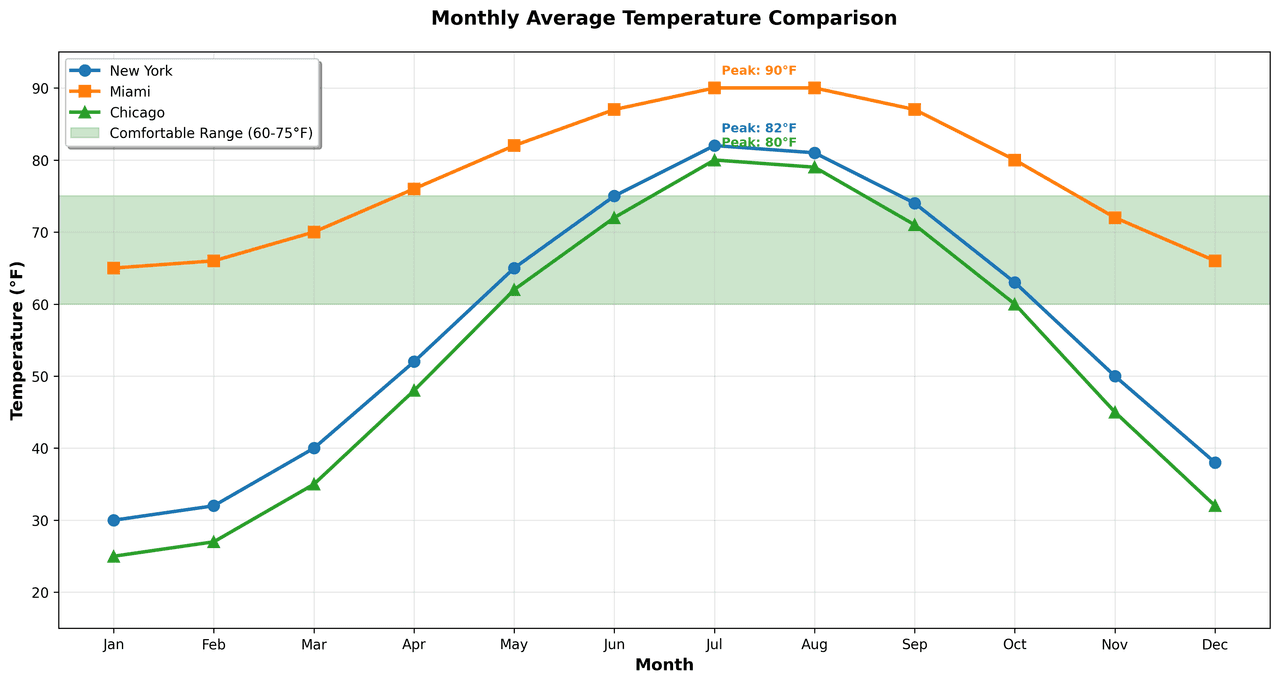
Line Graph
Displays data points connected by straight line segments to show trends over time.
Sample code / prompt
import matplotlib.pyplot as plt
import numpy as np

# Generate temperature data for 3 major US cities over 12 months
months = ['Jan', 'Feb', 'Mar', 'Apr', 'May', 'Jun', 'Jul', 'Aug', 'Sep', 'Oct', 'Nov', 'Dec']
nyc = [30, 32, 40, 52, 65, 75, 82, 81, 74, 63, 50, 38]
miami = [65, 66, 70, 76, 82, 87, 90, 90, 87, 80, 72, 66]
chicago = [25, 27, 35, 48, 62, 72, 80, 79, 71, 60, 45, 32]

# Create figure with enhanced stylingSkip Straight to Phase 4
Upload your cleaned data and let AI generate the Python code for your publication figures.
Technique guides scientists read next
scipy.signal.find_peaks guide
Tune prominence and width parameters for robust peak extraction.
Savitzky-Golay smoothing
Reduce noise while preserving peak shape and position.
PCA visualization workflow
Move from high-dimensional measurements to interpretable components.
ANOVA with post-hoc brackets
Add statistically correct pairwise significance annotations.
Found this helpful? Share it with your network.
Experimental Physicist & Photonics Researcher
Hands-on experience in silicon photonics, semiconductor fabrication (DRIE/ICP-RIE), optical simulation, and data-driven analysis. Built Plotivy to help researchers focus on discoveries instead of data struggles.
More about the authorVisualize your own data
Apply the techniques from this article to your own datasets. Upload CSV, Excel, or paste data directly.