Statistical Figures for Clinical Research: Survival Curves, Forest Plots, and CONSORT Diagrams Done Right

Clinical research demands a unique class of statistical figures. A Kaplan-Meier curve that omits the at-risk table, a forest plot with misaligned confidence intervals, or a CONSORT diagram that skips allocation details - any of these will trigger revision requests from journals like The Lancet, NEJM, or JAMA. Peer reviewers in clinical medicine are trained to scrutinize figures as closely as the statistical methods section itself.
This guide covers the five figure types that clinical researchers encounter most frequently. Every section includes complete, runnable Python code you can adapt to your own trial data, or you can skip the manual coding entirely and generate publication-ready figures with Plotivy.
What You'll Learn
1.What This Guide Covers
2.Kaplan-Meier Survival Curves
3.Forest Plots
4.CONSORT Flow Diagrams
5.Error Bars in Clinical Data
6.Color Accessibility in Medical Figures
7.Quick Reference Checklist
8.Generate Clinical Research Figures Automatically
What This Guide Covers
- Kaplan-Meier Survival Curves with confidence intervals and at-risk tables
- Forest Plots for meta-analysis and subgroup analysis
- CONSORT Flow Diagrams for randomized controlled trials
- Error Bars in Clinical Data - SD vs. SEM vs. 95% CI
- Color Accessibility in Medical Figures
1. Kaplan-Meier Survival Curves
The Kaplan-Meier estimator is the foundation of time-to-event analysis in clinical trials. Whether you are reporting overall survival, disease-free survival, or time to progression, the KM curve is almost certainly required. Journals expect more than a simple step function: they want Greenwood confidence intervals, an at-risk table below the x-axis, censoring tick marks, and a log-rank p-value annotation.
The lifelines library is the standard Python tool for survival analysis. It implements the Kaplan-Meier estimator with proper Greenwood variance, handles right-censored data correctly, and integrates with matplotlib for figure customization. Related statistical methods like the t-test and ANOVA are useful for comparing continuous endpoints, but survival data requires its own framework.
Key requirements for publication: The curve must show censored observations as tick marks. The 95% confidence band (Greenwood) should appear as shading, not error bars. The number at risk at regular intervals must appear in a table immediately below the plot. A log-rank test p-value should be annotated on the figure itself or stated in the caption.
The ci_show=True parameter renders the Greenwood 95% confidence interval as a translucent band around each step function. The add_at_risk_counts function appends a table of patients remaining at each time point directly below the x-axis, which is a strict requirement for most oncology and cardiology journals. Censored observations appear as small vertical ticks on the curve automatically when using lifelines.
Common mistakes to avoid: Truncating the x-axis before the last event, omitting the at-risk table, using inappropriate interpolation instead of a step function, and failing to report the log-rank or Cox regression p-value. If your trial has a crossover design, make sure the analysis handles treatment switching appropriately before plotting.
2. Forest Plots
Forest plots are the standard visual summary for meta-analyses and subgroup analyses. Each row shows a study or subgroup name, a point estimate (hazard ratio, odds ratio, or risk ratio), a horizontal confidence interval, and often a weight indicator. The bottom row typically displays a diamond representing the pooled summary estimate. A vertical reference line at the null value (1.0 for ratios, 0 for differences) anchors the interpretation.
While R packages like metafor are common for meta-analysis, Python gives you full control over the layout using matplotlib. The code below constructs a forest plot from scratch, which is essential when you need to match a specific journal template or integrate the forest plot into a multi-panel figure. Knowing how to read effect sizes is also critical for related visualizations like the ROC curve, where diagnostic accuracy is summarized as a single metric with confidence bounds.
Heterogeneity statistics are reported alongside the pooled estimate. The I-squared statistic quantifies the percentage of variability due to between-study differences rather than chance. An I-squared above 50% signals substantial heterogeneity. Cochran Q and its p-value provide the formal test. These values should appear in the figure annotation or caption.
The square marker size scales with study weight, giving readers an immediate visual sense of each study's contribution to the pooled estimate. The diamond at the bottom represents the summary effect: its horizontal extent spans the 95% CI, and the center point marks the pooled odds ratio. The vertical dashed line at OR = 1.0 represents the null hypothesis of no effect.
Subgroup forest plots follow the same structure but insert horizontal dividers and subgroup summary diamonds between clusters of studies. If your meta-analysis includes more than ten studies, consider splitting into subgroup panels or using a funnel plot alongside the forest plot to assess publication bias.
3. CONSORT Flow Diagrams
The CONSORT 2010 Statement requires a flow diagram for every randomized controlled trial. The diagram traces participants from enrollment through allocation, follow-up, and analysis. It must include the number screened, excluded (with reasons), randomized, allocated to each arm, lost to follow-up (with reasons), discontinued, and analyzed. Journals will reject manuscripts that lack this diagram or present it incompletely.
Try it
Try it now: turn this method into your next figure
Apply the same approach to your own dataset and generate clean, publication-ready code and plots in minutes.
Open in Plotivy Analyze →Newsletter
Get a weekly Python plotting tip
One concise tip each week for cleaner, faster scientific figures. Built for researchers who publish.
When to use STROBE instead: CONSORT applies to randomized trials. For observational studies (cohort, case-control, cross-sectional), the STROBE statement provides the equivalent reporting framework. STROBE flow diagrams are similar in concept but reflect the different study design, showing eligibility screening, exposure classification, and outcome ascertainment rather than randomization and allocation.
The following code produces a standard four-stage CONSORT diagram using matplotlib patches and annotations. You can adjust box dimensions, text content, and arrow routing to match your specific trial design.
Each box corresponds to a stage in the CONSORT framework. The exclusion box branches off to the right of the enrollment box, showing exactly how many participants were excluded and why. The two-column layout below randomization reflects the parallel-group design. For crossover trials, you would add a horizontal swap arrow between the treatment arms at the midpoint.
Practical tip: Many journals accept CONSORT diagrams generated in drawing tools (PowerPoint, Lucidchart), but a matplotlib-based approach ensures the diagram is reproducible, version-controlled, and consistent with your other figures. If your trial has more than two arms or a factorial design, extend the layout by adding columns and adjusting the x-coordinates accordingly.
4. Error Bars in Clinical Data
Error bars are among the most misused elements in clinical figures. A bar chart showing mean blood pressure with error bars could display the standard deviation (SD), the standard error of the mean (SEM), or the 95% confidence interval (CI) - and each communicates fundamentally different information. Reviewers will reject figures where the error bar type is ambiguous or inappropriate for the claim being made.
SD vs. SEM vs. 95% CI: When to Use Each
- Standard Deviation (SD): Describes the spread of individual observations. Use when you want to show the variability within your sample. Appropriate for descriptive statistics and baseline characteristics tables.
- Standard Error of the Mean (SEM): Describes the precision of the sample mean as an estimate of the population mean. SEM = SD / sqrt(n), so it shrinks with larger samples. Use when comparing group means, but be aware that SEM bars visually minimize variability and are often criticized for this reason.
- 95% Confidence Interval: The range that, under repeated sampling, would contain the true population mean 95% of the time. Preferred by most clinical journals because it directly relates to hypothesis testing: if two 95% CIs do not overlap, the difference is statistically significant at approximately the 0.05 level.
Rule of thumb: If your figure supports an inferential claim (e.g., treatment A is superior to treatment B), use 95% CI. If you are describing a single population, use SD. Avoid SEM unless the journal specifically requests it, and always label the error bar type in the figure caption.
Paired data display: When measurements come from the same patients (e.g., pre- and post-treatment), standard bar charts with error bars obscure the within-subject change. Instead, use a paired dot plot or spaghetti plot that connects each patient's two measurements with a line. This makes the direction and magnitude of individual responses visible, which is far more informative than showing two group means with overlapping CIs.
This side-by-side comparison illustrates why the choice of error bar matters. The SD bars are the widest because they reflect individual variability. The SEM bars are the narrowest - deceptively so - because SEM shrinks with sample size, which can make differences appear more significant than they are. The 95% CI bars fall between the two and provide the most honest visual representation of inferential uncertainty.
5. Color Accessibility in Medical Figures
Colorblind-safe palettes are not optional in clinical research publishing. Approximately 8% of males and 0.5% of females have some form of color vision deficiency, which means a substantial fraction of your reviewers, editors, and readers may not be able to distinguish red from green. Journals including Nature Medicine, The BMJ, and JAMA now explicitly require that figures remain interpretable under the most common forms of color blindness (deuteranopia and protanopia).
Recommended Colorblind-Safe Palette (Wong 2011)
The following palette, proposed by Bang Wong in Nature Methods, is widely adopted in clinical and biomedical publishing. These eight colors are distinguishable under all three major types of color vision deficiency.
- Blue:
#0072B2- primary group, treatment arm - Orange:
#D55E00- comparator, control arm - Green:
#009E73- third group, positive outcome - Yellow:
#F0E442- highlights, annotations - Sky Blue:
#56B4E9- secondary blue, confidence bands - Vermillion:
#E69F00- warnings, adverse events - Purple:
#CC79A7- additional group, subgroup - Black:
#000000- reference lines, text
Verification methods: Before submitting, test your figures with a color blindness simulator. The Python package colorspacious can programmatically convert images to simulate deuteranopia, protanopia, and tritanopia. Online tools like Coblis (color-blindness.com) and the Sim Daltonism macOS app provide quick visual checks. Adobe Acrobat Pro also includes a built-in accessibility checker that flags color-dependent information.
Beyond color choice, use redundant encoding whenever possible. Combine color with line style (solid, dashed, dotted) for Kaplan-Meier curves, and combine color with marker shape (circle, square, triangle) for scatter plots and forest plots. This dual-encoding strategy ensures that figures remain fully interpretable even in greyscale printouts, which are still common in clinical practice.
Setting the axes.prop_cycle parameter at the top of your script ensures every subsequent plot in the session uses the accessible palette without requiring explicit color arguments. This is the simplest way to enforce accessibility across an entire manuscript's figures.
Quick Reference Checklist
Before submitting your next clinical research manuscript, verify every figure against this checklist:
- Kaplan-Meier: Step function with censoring ticks, Greenwood 95% CI band, at-risk table below x-axis, log-rank p-value annotated, median survival marked if reached.
- Forest Plot: Studies ordered consistently (by year or effect size), square size proportional to weight, diamond for pooled estimate, null reference line at 1.0, I-squared and Q statistics reported.
- CONSORT: All four stages present (enrollment, allocation, follow-up, analysis), exclusion reasons itemized, numbers add up at every branch, ITT population clearly identified.
- Error Bars: Type clearly labeled (SD, SEM, or 95% CI), chosen appropriately for the claim, paired data shown with connecting lines rather than grouped bars.
- Color: Colorblind-safe palette applied, redundant encoding (linestyle, marker shape) used, greyscale-tested, verified with a CVD simulator before submission.
Chart gallery
Clinical Research Chart Templates
Browse chart types commonly used in clinical trials and medical research.
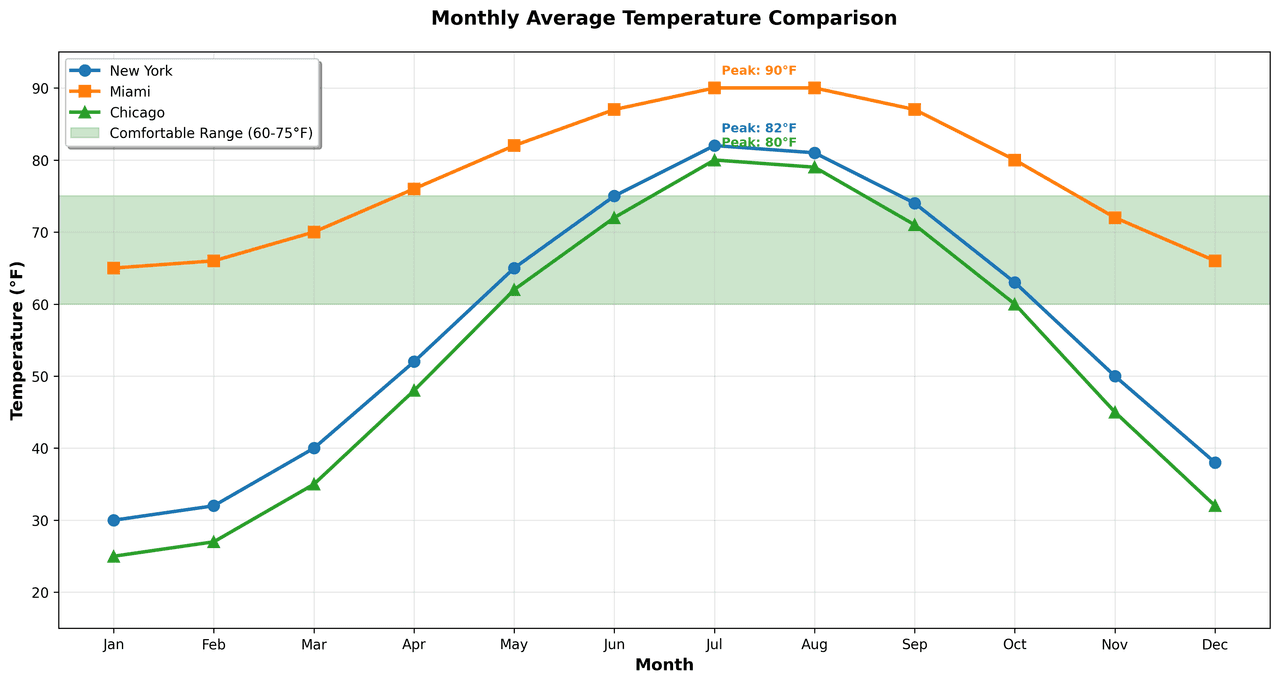
Line Graph
Displays data points connected by straight line segments to show trends over time.
Sample code / prompt
import matplotlib.pyplot as plt
import numpy as np

# Generate temperature data for 3 major US cities over 12 months
months = ['Jan', 'Feb', 'Mar', 'Apr', 'May', 'Jun', 'Jul', 'Aug', 'Sep', 'Oct', 'Nov', 'Dec']
nyc = [30, 32, 40, 52, 65, 75, 82, 81, 74, 63, 50, 38]
miami = [65, 66, 70, 76, 82, 87, 90, 90, 87, 80, 72, 66]
chicago = [25, 27, 35, 48, 62, 72, 80, 79, 71, 60, 45, 32]

# Create figure with enhanced styling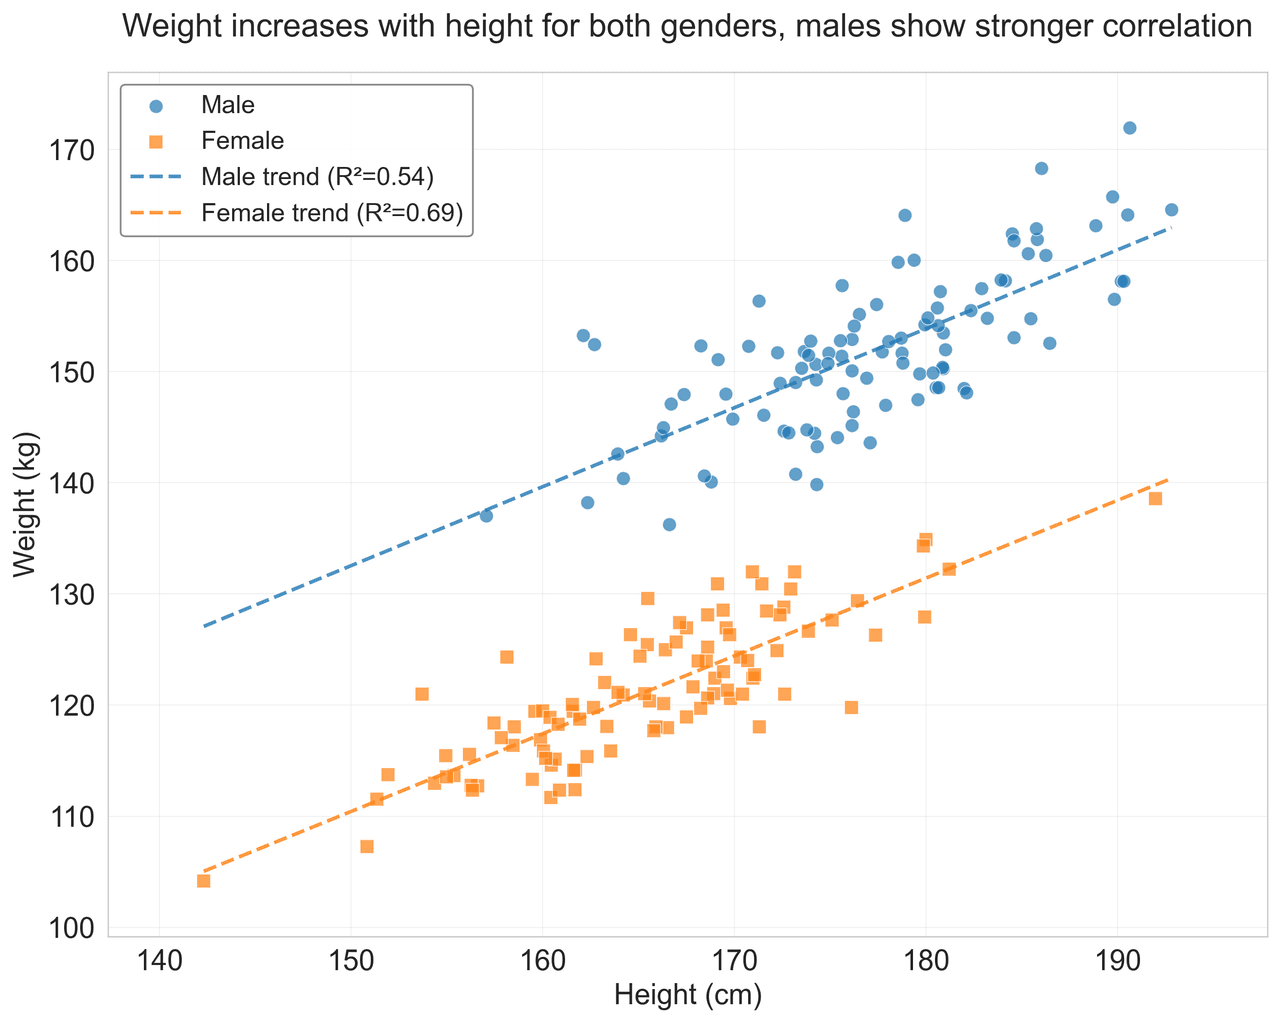
Scatterplot
Displays values for two variables as points on a Cartesian coordinate system.
Sample code / prompt
import matplotlib.pyplot as plt
import numpy as np
from scipy import stats
import pandas as pd

# Generate sample data
np.random.seed(42)
n_samples = 200
height = np.random.normal(170, 8, n_samples)
weight = height * 0.6 + np.random.normal(0, 8, n_samples) - 50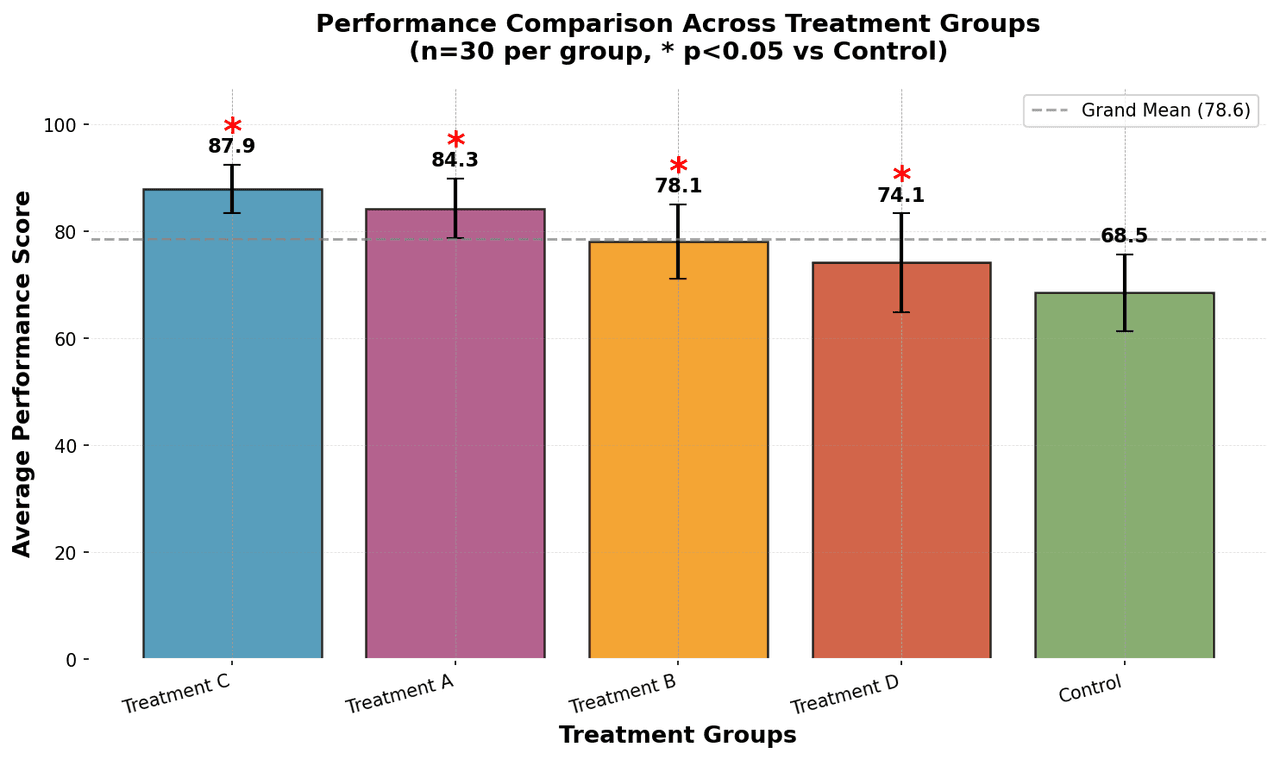
Bar Chart
Compares categorical data using rectangular bars with heights proportional to values.
Sample code / prompt
import numpy as np
import pandas as pd
import matplotlib.pyplot as plt
import seaborn as sns
from scipy import stats

# Generate performance scores for 5 treatment groups
np.random.seed(42)
groups = ['Control', 'Treatment A', 'Treatment B', 'Treatment C', 'Treatment D']
n_samples = 30.png&w=1280&q=70)
Box and Whisker Plot
Displays data distribution using quartiles, median, and outliers in a standardized format.
Sample code / prompt
import numpy as np
import pandas as pd
import matplotlib.pyplot as plt
import seaborn as sns
from scipy import stats

# Generate gene expression data for 4 genotypes
np.random.seed(42)
genotypes = ['WT', 'KO1', 'KO2', 'Mutant']
n_per_group = 20
Error Bars
Graphical representations of the variability of data indicating error or uncertainty in measurements.
Sample code / prompt
import numpy as np
import matplotlib.pyplot as plt
from scipy import stats

# Generate bacterial growth data with replicates
np.random.seed(42)
time_points = np.array([0, 4, 8, 12, 18, 24])
mean_values = np.array([10, 25, 80, 250, 600, 800])

# Generate 5 replicates per time point with noiseGenerate Clinical Research Figures Automatically
Upload your clinical trial data and let AI produce publication-ready Kaplan-Meier curves, forest plots, and CONSORT diagrams - no manual matplotlib coding required.
Start CreatingTechnique guides scientists read next
scipy.signal.find_peaks guide
Tune prominence and width parameters for robust peak extraction.
Savitzky-Golay smoothing
Reduce noise while preserving peak shape and position.
PCA visualization workflow
Move from high-dimensional measurements to interpretable components.
ANOVA with post-hoc brackets
Add statistically correct pairwise significance annotations.
Found this helpful? Share it with your network.
Experimental Physicist & Photonics Researcher
Hands-on experience in silicon photonics, semiconductor fabrication (DRIE/ICP-RIE), optical simulation, and data-driven analysis. Built Plotivy to help researchers focus on discoveries instead of data struggles.
More about the authorVisualize your own data
Apply the techniques from this article to your own datasets. Upload CSV, Excel, or paste data directly.